
Once you enroll providers, you can update them at any time in the Provider Information window.
- From the menu to the left, click the Provider Management.
- Select Provider Information. The Provider Information window opens.
- Choose the Provider Status, Date if applicable, and then select the appropriate provider in the Provider drop down.
- Click each box to change and enter new information over the existing information. You can change information in each on each of the tabs (General, Contact, Licensing, Tiering, Meals, Other).
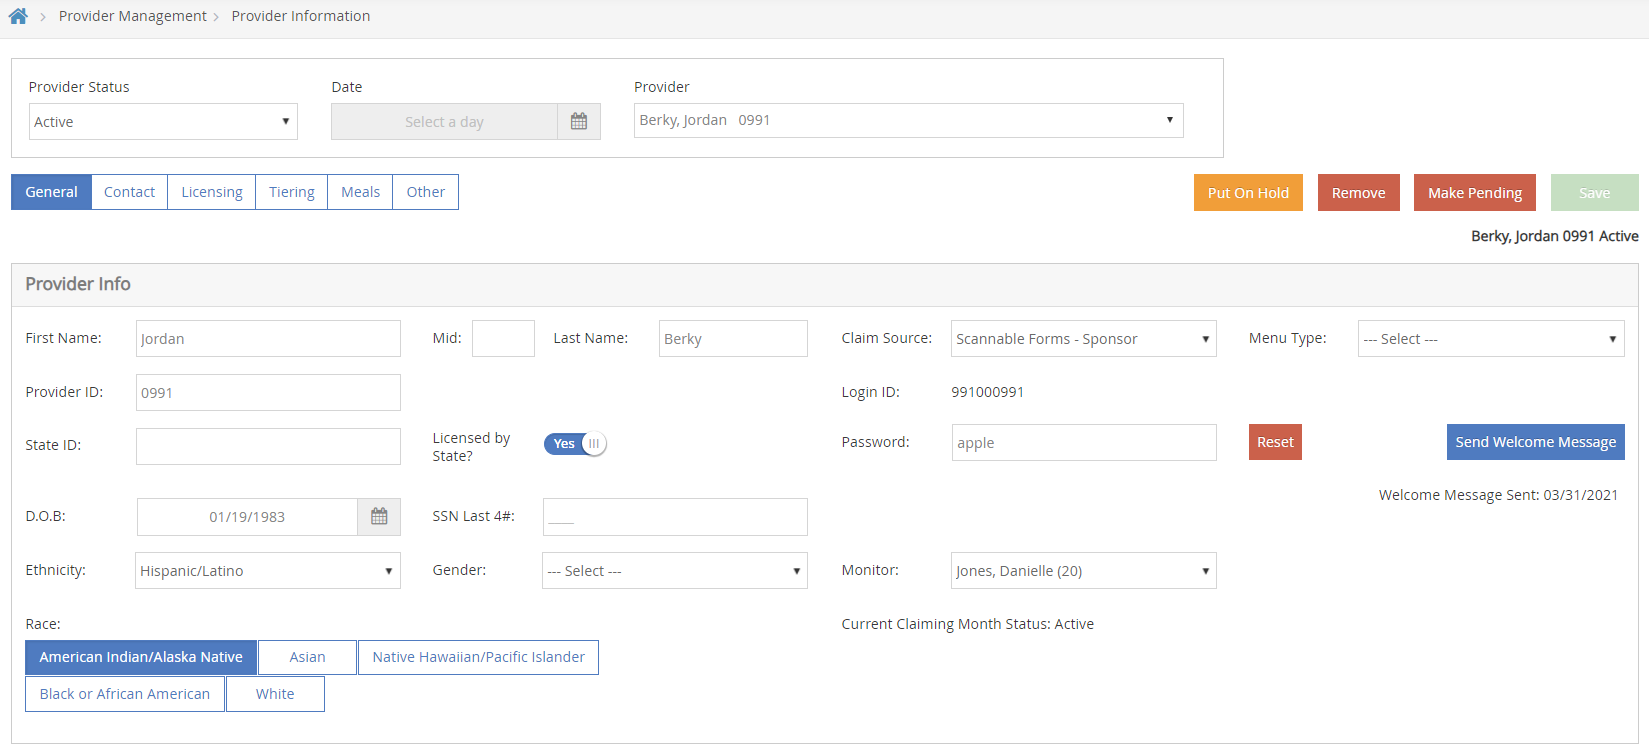
- When finished, click Save.

Manage Provider Capacity
The Provider Information Licensing tab allows you to record virtually all aspects of information related to the provider's capacity. KidKare uses capacity information when processing KidKare claims, scannable form claims, or Direct Entry claims. If you review claims manually, this information is also available on certain reports for you to use as a benchmark.
Note: KidKare does not check capacity on manually entered claims.
Each state handles capacity in different ways, and each state also handles capacity checks in different ways for different types of family child care home licenses or registrations.
For some licenses/states, the allowed capacity at any given meal is fixed and cannot be varied for individual providers. If this is the case, then you cannot change the capacity for individual providers and are given a Maximum Capacity value when you select the provider's license type.
For other licenses/states, the allowed capacity is more flexible. This means you can change the maximum allowed capacity for individual providers. You can also typically set a maximum capacity for infants, as well as a maximum overall capacity. If this is the case, you can see two boxes in the Licensing tab: one allowing you to enter an infant capacity maximum and one for a school-aged (overall) capacity maximum. Therefore, change the numbers in these boxes to vary the capacity.

Still other states/licenses vary the allowed capacity based on the specific meal served. If this is the case for you, then you will see each of the six meal listed, which allows you to supply a maximum capacity just for that meal.
Waivers
Capacity waivers are allowed in certain states/for certain licenses. When a waiver is in effect for a provider, that provider is exempt from over-capacity errors. Waivers typically have start and end dates, and you must supply such dates when you indicate a waiver is in effect. If a waiver only applies when a particular child is in attendance, you can indicate that the waiver is child-specific and then specify the appropriate child. You can also enter a description.
To set a waiver:
- From the menu to the left, click the Provider Management.
- Select Provider Information. The Provider Information window opens.
- Choose the Provider Status, Date if applicable, and then select the appropriate provider in the Provider drop down.
- Click the Licensing tab.
- Check the Waiver box.
- Click the Start Date and End Date boxes and set a start and end date for the waiver, if required.
- If this waiver is child-specific, check the Child Specific box. Then, select the child to which the variance applies.
- Enter any description, as needed.
- Click Save.
Variances
Capacity variances are allowed in certain states/for certain licenses. When a variance is in effect for a provider, that provider's capacity is increased or decreased by the amount you enter.
- From the menu to the left, click the Provider Management.
- Select Provider Information. The Provider Information window opens.
- Choose the Provider Status, Date if applicable, and then select the appropriate provider in the Provider drop down
- Click the Licensing tab.
- Check the Variance box.
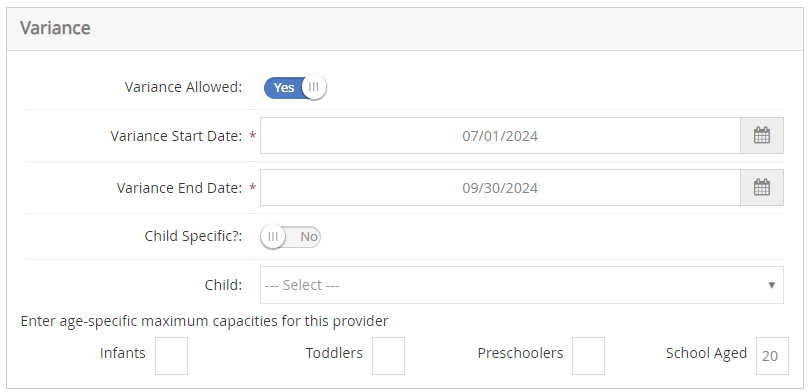
- Click the Start Date and End Date boxes and enter a start and end date for the variance.
- If this variance is child-specific, check the Child Specific box. Then, select the child to which the variance applies.
- In the Please Enter the Specific Amount(s) to Increase Capacity By section, click each box that applies and enter the amount by which to change the capacity.
- Increase Capacity: Enter a positive value in the specific age category.
- Decrease Capacity: Enter a negative value in the specific age category.
- Click Save.

Manage Provider Tiering
You record a provider's Tier and Tier qualifying information in the Provider Information Tiering tab. This information is essential, as it determines reimbursement rates for the provider.

- Tier: A provider's tier can be set to the following:
- 2: Providers are set to Tier 2 by default, unless you specify otherwise. If you select Tier 2, you can set a Tier 2 effective date, which can be useful in certain states to record when you attempted to verify the provider's tier (even though they don't qualify).
- 1: Select Tier 1 if the provider meets school, income, or census requirements for Tier 1 reimbursements. This means that all children enrolled with this provider should be reimbursed at Tier 1, even if the children themselves are not set up as Tier 1 Income Eligible. Note that this does not guarantee that claims will be reimbursed at Tier 1. The qualifying dates in this tab must be valid (see below).
- M: Select M if the provider is Mixed-Tier. This means that the provider is not Tier 1, but they have children enrolled who are Tier 1 income Eligible.
- Income Eligibility: If the provider is Tier 1 by Income, click the Start Date and End Date boxes and enter the starting and end dates for this qualifying status. Once these dates expire, the provider will be automatically reimbursed at Tier 2 rates unless the dates have been updated prior to the reimbursement being issued. However, the Tier drop-down menu remains set to 1 until you actively change it. End dates are inclusive, which means that if you set the End Date to June 30th, the provider is treated as Tier 1 on June 30th.
- Food Stamp Eligible: If a provider is categorically eligible for Tier 1 because they are Food Stamp participants, you must supply Income Eligibility Dates and you must also indicate that the provider is Food Stamp Eligible. Check this box. Then, click the Case Number box and enter the provider's food stamp case number. The Start/End dates are required by some state agencies. This information prints on the Provider List Export File when you report this information to your state agency.
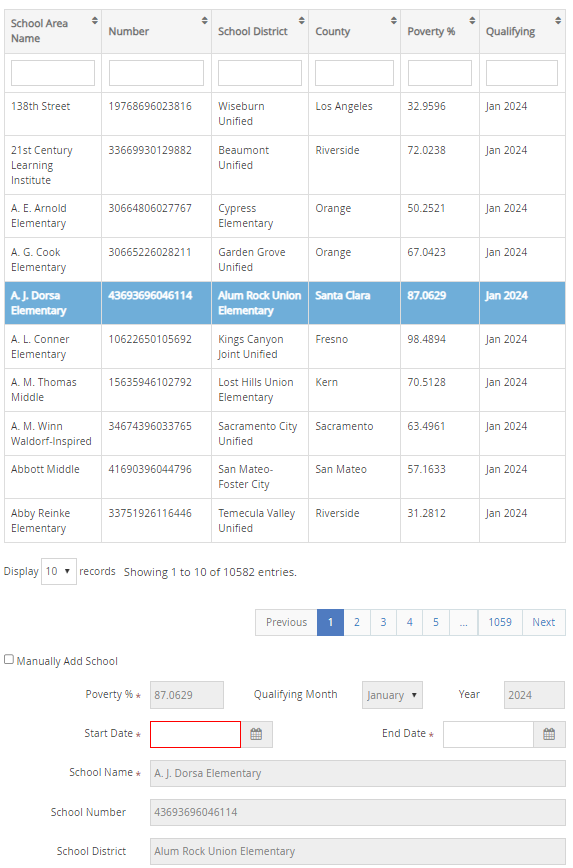
- Schools: If the provider is Tier 1 due to the poverty percentage at the nearest school(s), click Add School and enter school eligibility information. Note that KidKare only examines Start and End dates by default when determining tier eligibility. However, KidKare can be configured to examine the poverty percentages. Check your Sponsor Preferences. You must provide start and end tiering dates as follows:
- In states where KidKare has the state's school tiering list in electronic format, a list of schools displays. Select the school area that applies to this provider. The relevant information (poverty percentage, etc), populate the remaining fields automatically. When you enter the tiering start date, the end date automatically defaults to five (5) years after the start date. Save your changes. You can add additional schools for which the provider qualifies.
- In these states, you should assign every provider to the closest school(s), even if that school area does not qualify for Tier 1 reimbursement. Leave the dates blank for each area in which the school does not qualify. If you have assigned every provider to a specific school, you can run the School Tier Comparison report each year when new rates are released by your state. This report lists any providers who used to be Tier 2, but whose school area now qualifies due to the school area's poverty threshold. Using this information, you can reassign provider tiers as appropriate.
- In these states, you should assign every provider to the closest school(s), even if that school area does not qualify for Tier 1 reimbursement. Leave the dates blank for each area in which the school does not qualify. If you have assigned every provider to a specific school, you can run the School Tier Comparison report each year when new rates are released by your state. This report lists any providers who used to be Tier 2, but whose school area now qualifies due to the school area's poverty threshold. Using this information, you can reassign provider tiers as appropriate.
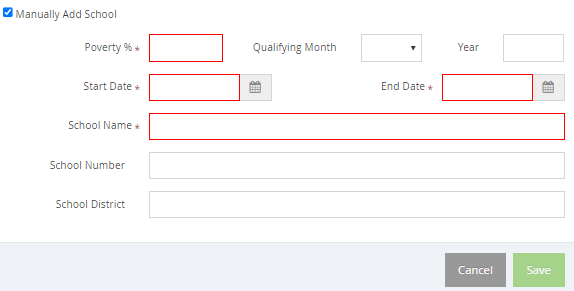
- If your state does not have school data in the KidKare database, you must manually enter all information for each school area that applies to the provider. Click Add School and then check the Manually Add School box at the bottom of the screen. Enter the required information. You can add additional schools for which the provider qualifies.
- In states where KidKare has the state's school tiering list in electronic format, a list of schools displays. Select the school area that applies to this provider. The relevant information (poverty percentage, etc), populate the remaining fields automatically. When you enter the tiering start date, the end date automatically defaults to five (5) years after the start date. Save your changes. You can add additional schools for which the provider qualifies.
- Census District: If the provider is Tier 1 eligible due to census district, enter Start and End dates in the Census District section. You can also complete the Census District and Census Poverty % boxes, but these are optional, as KidKare only examines eligibility dates. End dates are inclusive, which means that if you set the End Date to June 30th, the provider is treated as Tier 1 on June 30th. You should always enter Tier 1 Census Eligibility, even if the provider qualifies for Tier 1 by another means.
- Your agency can be configured to pull the Census Block from a list (all census blocks are coded into KidKare by default). If you've enabled this feature, the Change Census Area button displays. Click it to choose the provider's census block from a list. The eligibility percentage will be automatically filled-in for you.
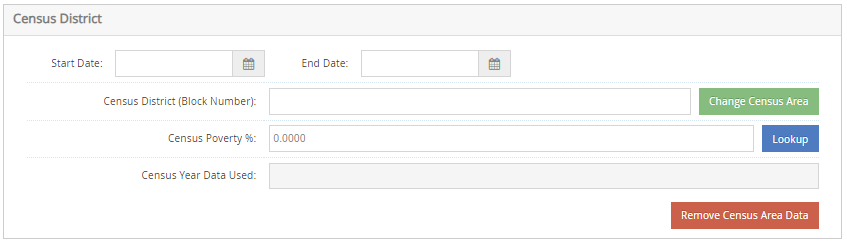
- Click Lookup to access a website created by FRAC that will identify the census block of the provider an indicate whether that census block is Tier 1 or not.
- Your agency can be configured to pull the Census Block from a list (all census blocks are coded into KidKare by default). If you've enabled this feature, the Change Census Area button displays. Click it to choose the provider's census block from a list. The eligibility percentage will be automatically filled-in for you.


Enter any special comments or notes in the Tier comments box. This information is for your own use only and has no effect on the provider's claim processing. You can enter up to 255 alphanumeric characters in this box.
Remember to save your changes before exiting this tab.
Manage the Same-Day Entry Requirement
You can control whether providers must record attendance data in KidKare on a daily basis. This setting affects providers on a case-by-case basis. You can adjust this requirement at any time.
Enable the Require Same Day Entry Box
First, update your sponsor preferences to enable the Require Same Day Entry box in the Provider Information Other tab.
- Click the Administration menu and select Sponsor Preferences. The Sponsor Preferences window opens.
- Click the Select Category to Move To drop-down menu and select M. Online Claiming Preferences.
- Check the 006. Use Day of Entry Requirement box.
- Click the Select Setting drop-down menu and select Y.
- Click Save.
Check the Require Same Day Entry Box
Once you have enabled the Require Same Day Entry box, check it for provider for whom to enable the same-day entry requirement.
- Click the Provider Management menu and select List Providers. The List Providers window opens.
- Set filters to locate the provider to change. Click the provider name and the Provider Information screen opens..
- Click the Other tab.
- Under the Additional Requirements section, check the Require Same Day Entry box.
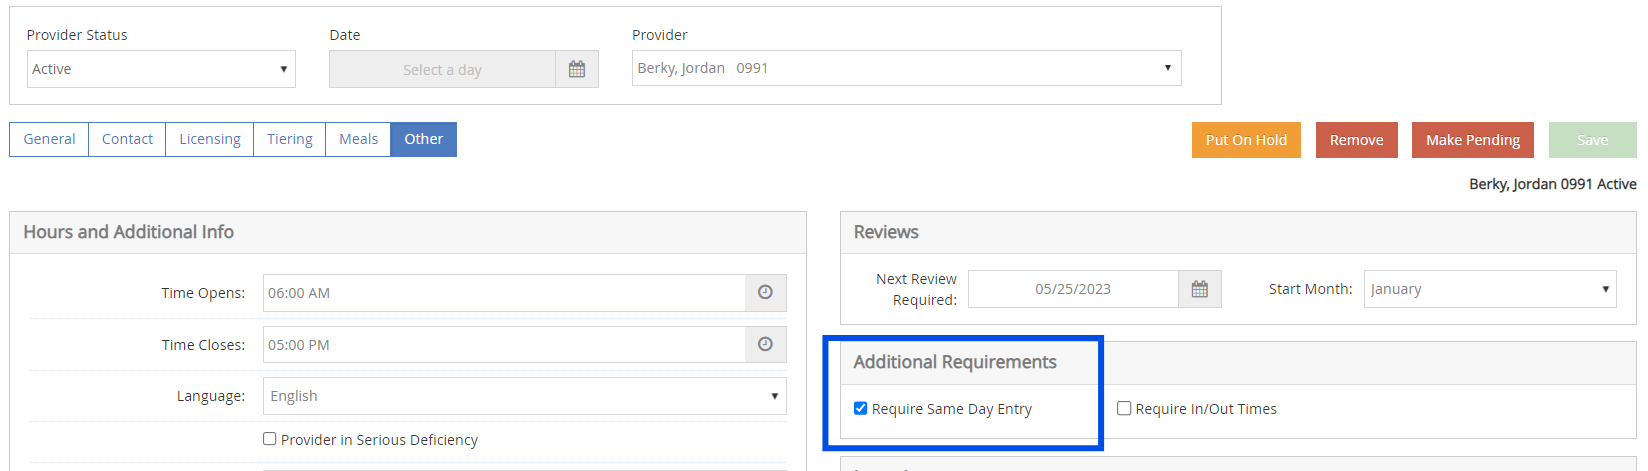
- Click Save.
- Repeat Steps 1-5 for each provider to update.

Disable the Same-Day Entry Requirement
At some times you may need to disable same-day entry requirement for individual providers or all providers. For example, if KidKare announces an extended maintenance window that may affect same-day entry, you may wish to temporarily remove this requirement.
There are two ways you can approach this:
- Clear the Require Same Day Entry box on individual provider records.
- Disable preference M.006 to remove the requirement for all providers.
Clear the Require Same Day Entry Box on Individual Provider Records
- Click the Provider Management menu and select List Providers. The List Providers window opens.
- Set filters to locate the provider to change.
- Click the provider name and the Provider Information screen opens.
- Click the Other tab.
- Under the Additional Requirements section, uncheck the Require Same Day Entry box.
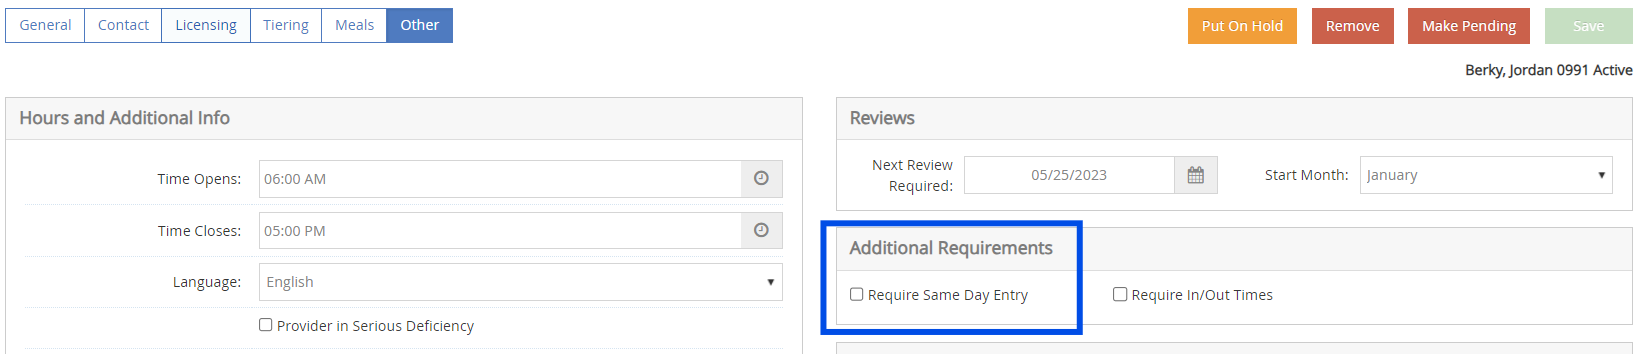
- Click Save.
- Repeat Steps 1-5 for each provider to update.

Disable Preference M.006
To disable same-day entry for all affected providers, disable preference M.006. When you re-enable this preference, Minute Menu HX retains prior selections in the Provider Information Other tab.
For example, if you checked the Require Same Day Entry box for provider Jane, disabled preference M.006, and later re-enabled it, Require Same Day Entry should still be checked for provider Jane.
- Click the Administration menu and select Sponsor Preferences. The Sponsor Preferences window opens.
- Click the Select Category to Move To drop-down menu and select M. Online Claiming Preferences.
- Check the 006. Use Day of Entry Requirement box.
- Click the Select Setting drop-down menu and select N.
- Click Save.