
You can manage payments to centers in KidKare. You can print checks, set up an ACH file for direct deposit, and/or export payment information to a third-party program.
If you do not currently offer direct deposit but would like to, talk to your bank. Make sure that your bank or credit union can accept upload files for direct deposit. KidKare uses the nationally accepted ACH file format NACHA.
To set up direct deposit:
- Add your banking information to KidKare
- From the menu to the left, click Administration.
- Select Manage ACH Settings. The Manage ACH Settings window opens.
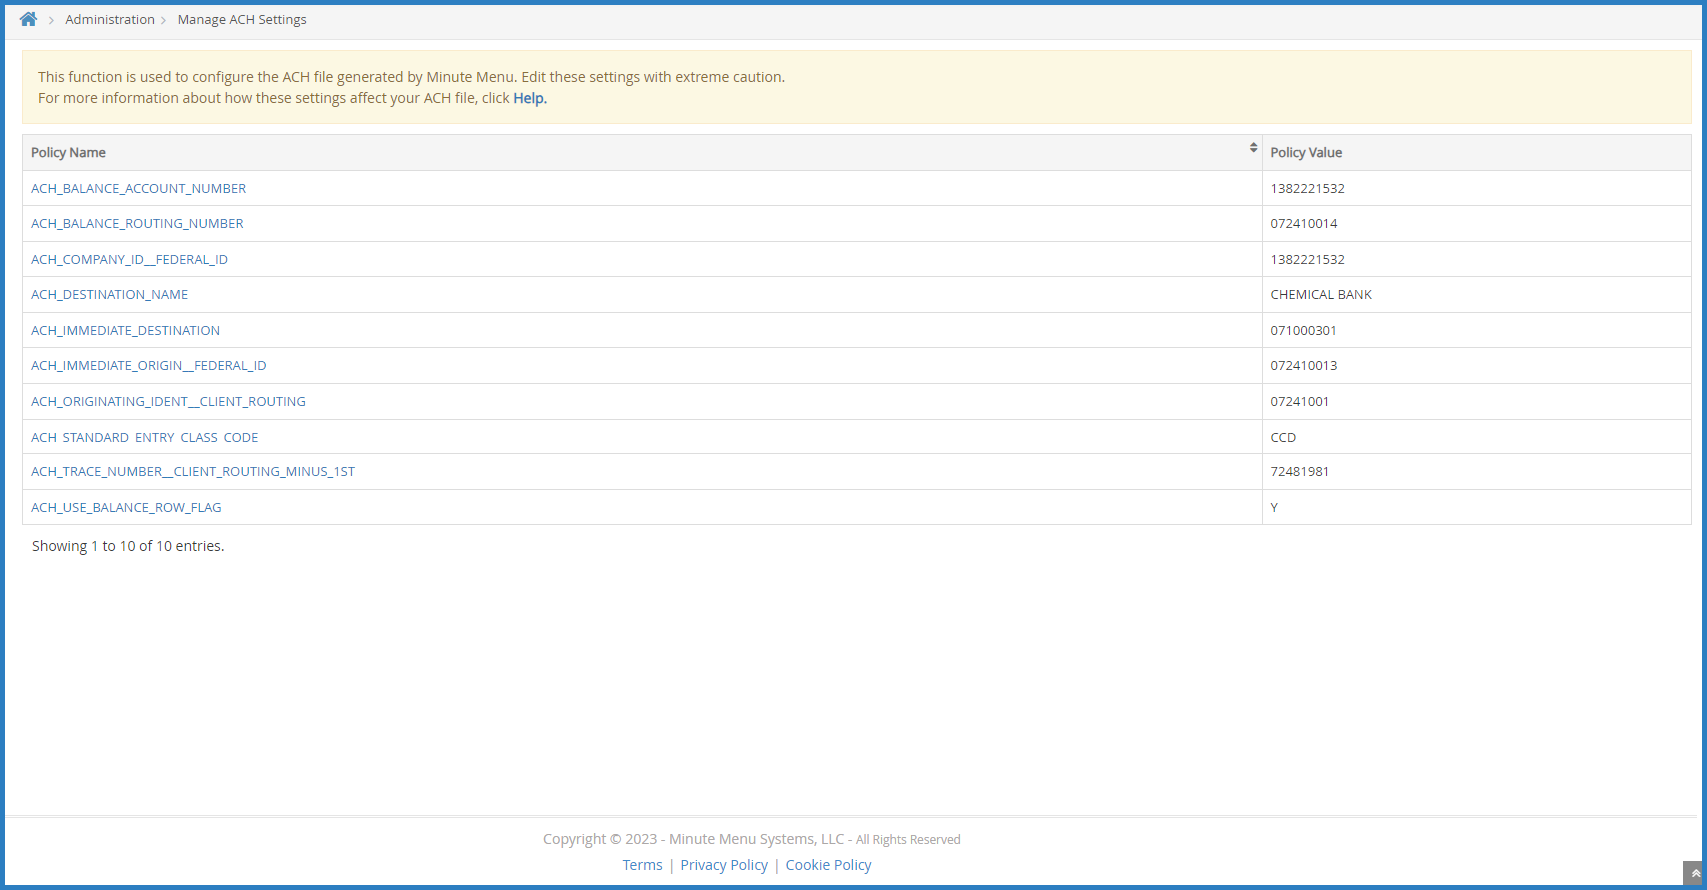
- Click each field to complete it. Each field opens in a pop-up window. Click Save each time to save your input. A description of each policy is below:
- ACH_BALANCE_ACCOUNT_NUMBER: If ACH_USE_BALANCE_ROW_FLAG below is Y, enter your bank account number.
- ACH_BALANCE_ROUTING_NUMBER: If ACH_USE_BALANCE_ROW_FLAG below is Y, enter your bank account routing number.
- ACH_COMPANY_ID__FEDERAL_ID: This is the bank's Company ID, which is usually tax ID number, sometimes preceded by 1.
- ACH_DESTINATION_NAME: This is your bank's name.
- ACH_IMMEDIATE_DESTINATION: This is the Immediate Destination Number, which is usually the bank's routing number.
- ACH_IMMEDIATE_ORIGIN__FEDERAL_ID: This is the Immediate Origin Number, which is usually the Company ID, and is sometimes the same as the bank's routing number.
- ACH_ORIGINATING_IDENT__CLIENT_ROUTING: This is the Originating DFI, which is typically the first 8 digits of the bank routing number.
- ACH_STANDARD_ENTRY_CLASS_CODE: This is the Standard Entry Class Code. The default is usually PPD.
- ACH_TRACE_NUMBER__CLIENT_ROUTING_MINUS_1ST: This is typically the last eight (8) digits of the bank routing number.
- ACH_USE_BALANCE_ROW_FLAG: If your bank requires a balancing entry, set this to Y and enter the Balance Account Number and Balance Routing Number (see above).
- Click Save.
- Next, enter bank account information for each center receiving direct deposit:
- From the menu to the left, click Center Management.
- Click the Select Center drop-down menu and select the center to update.
- Click the Oversight tab.
- Click
 next to Pay via Direct Deposit.
 - Click the Bank Account Type drop-down menu and select Checking, Money Market, or Savings.
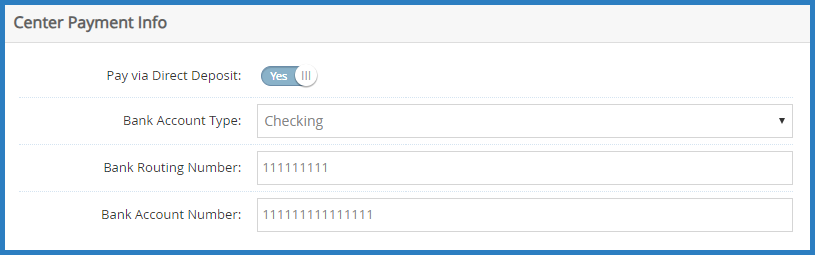
- Click the Bank Routing Number box and enter the center's bank routing number.
- Click the Bank Account Number box and enter the center's bank account number.
- Click Save.
- Repeat Steps 2b-2h for each center for which to set up direct deposit.
- Create a Pre-Note file. You must have at least one submitted claim before you can create a Pre-Note file. You can create a test claim, if needed.Note: Policy A.05 must be set to N before you can access the Issue Payments function.
- From the menu to the left, click Payments.
- Select Issue Payments.
- Click the Payment Type drop-down menu and select Direct Deposits.
- Check the box next to a claim to calculate.
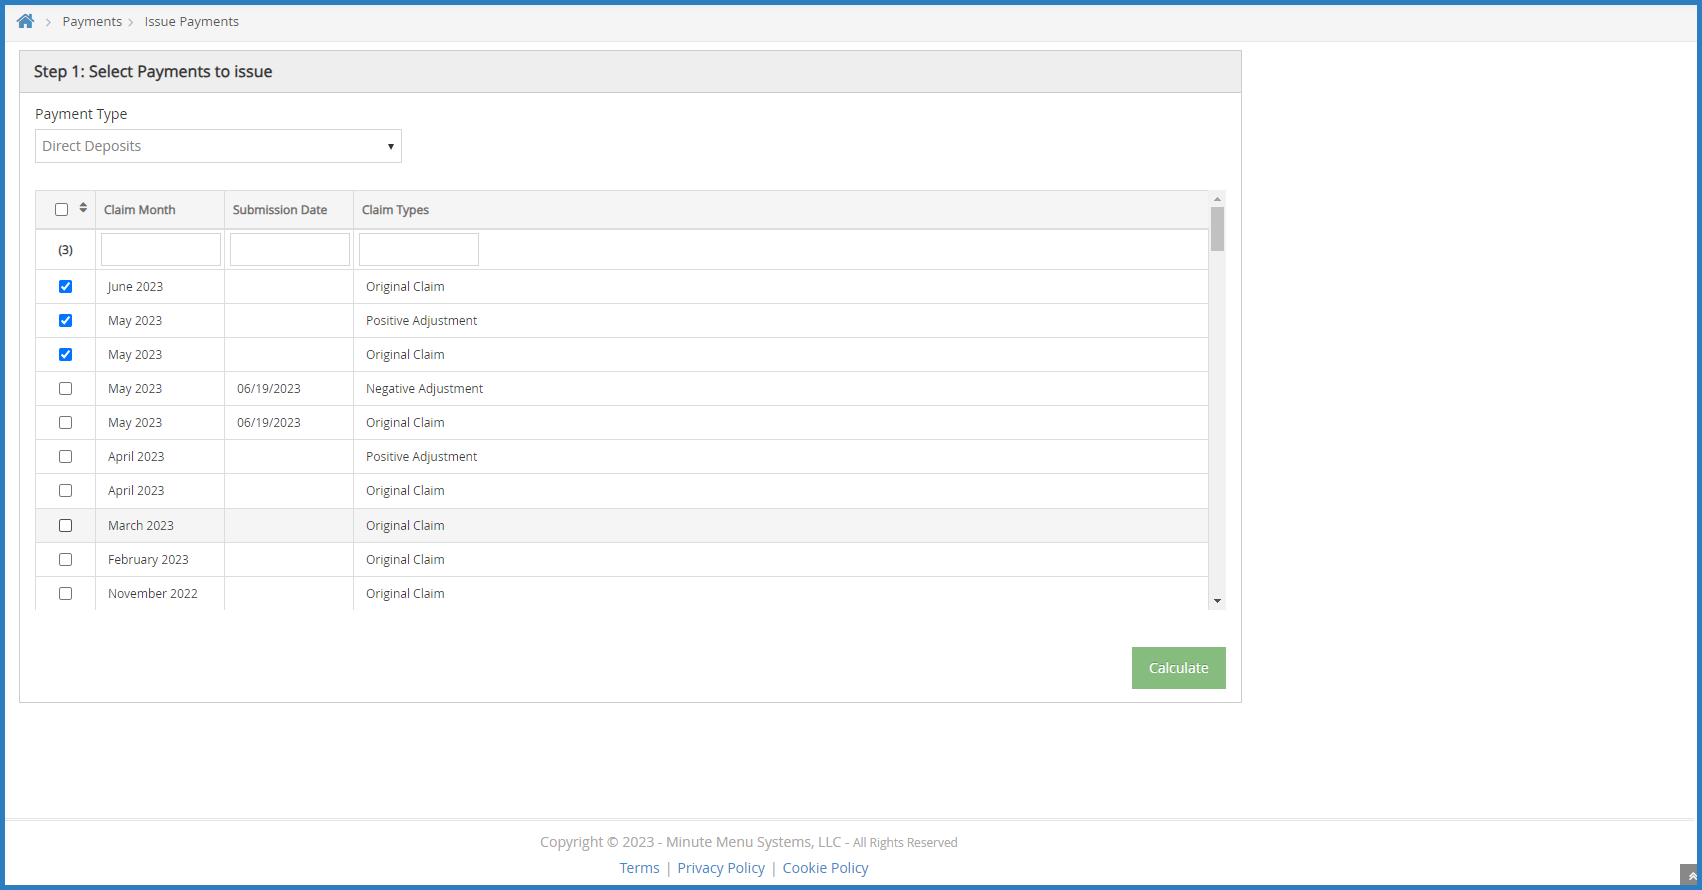
- Click Calculate.
- In the Step 2 Select Centers section, check the box next to the center(s) to pay.
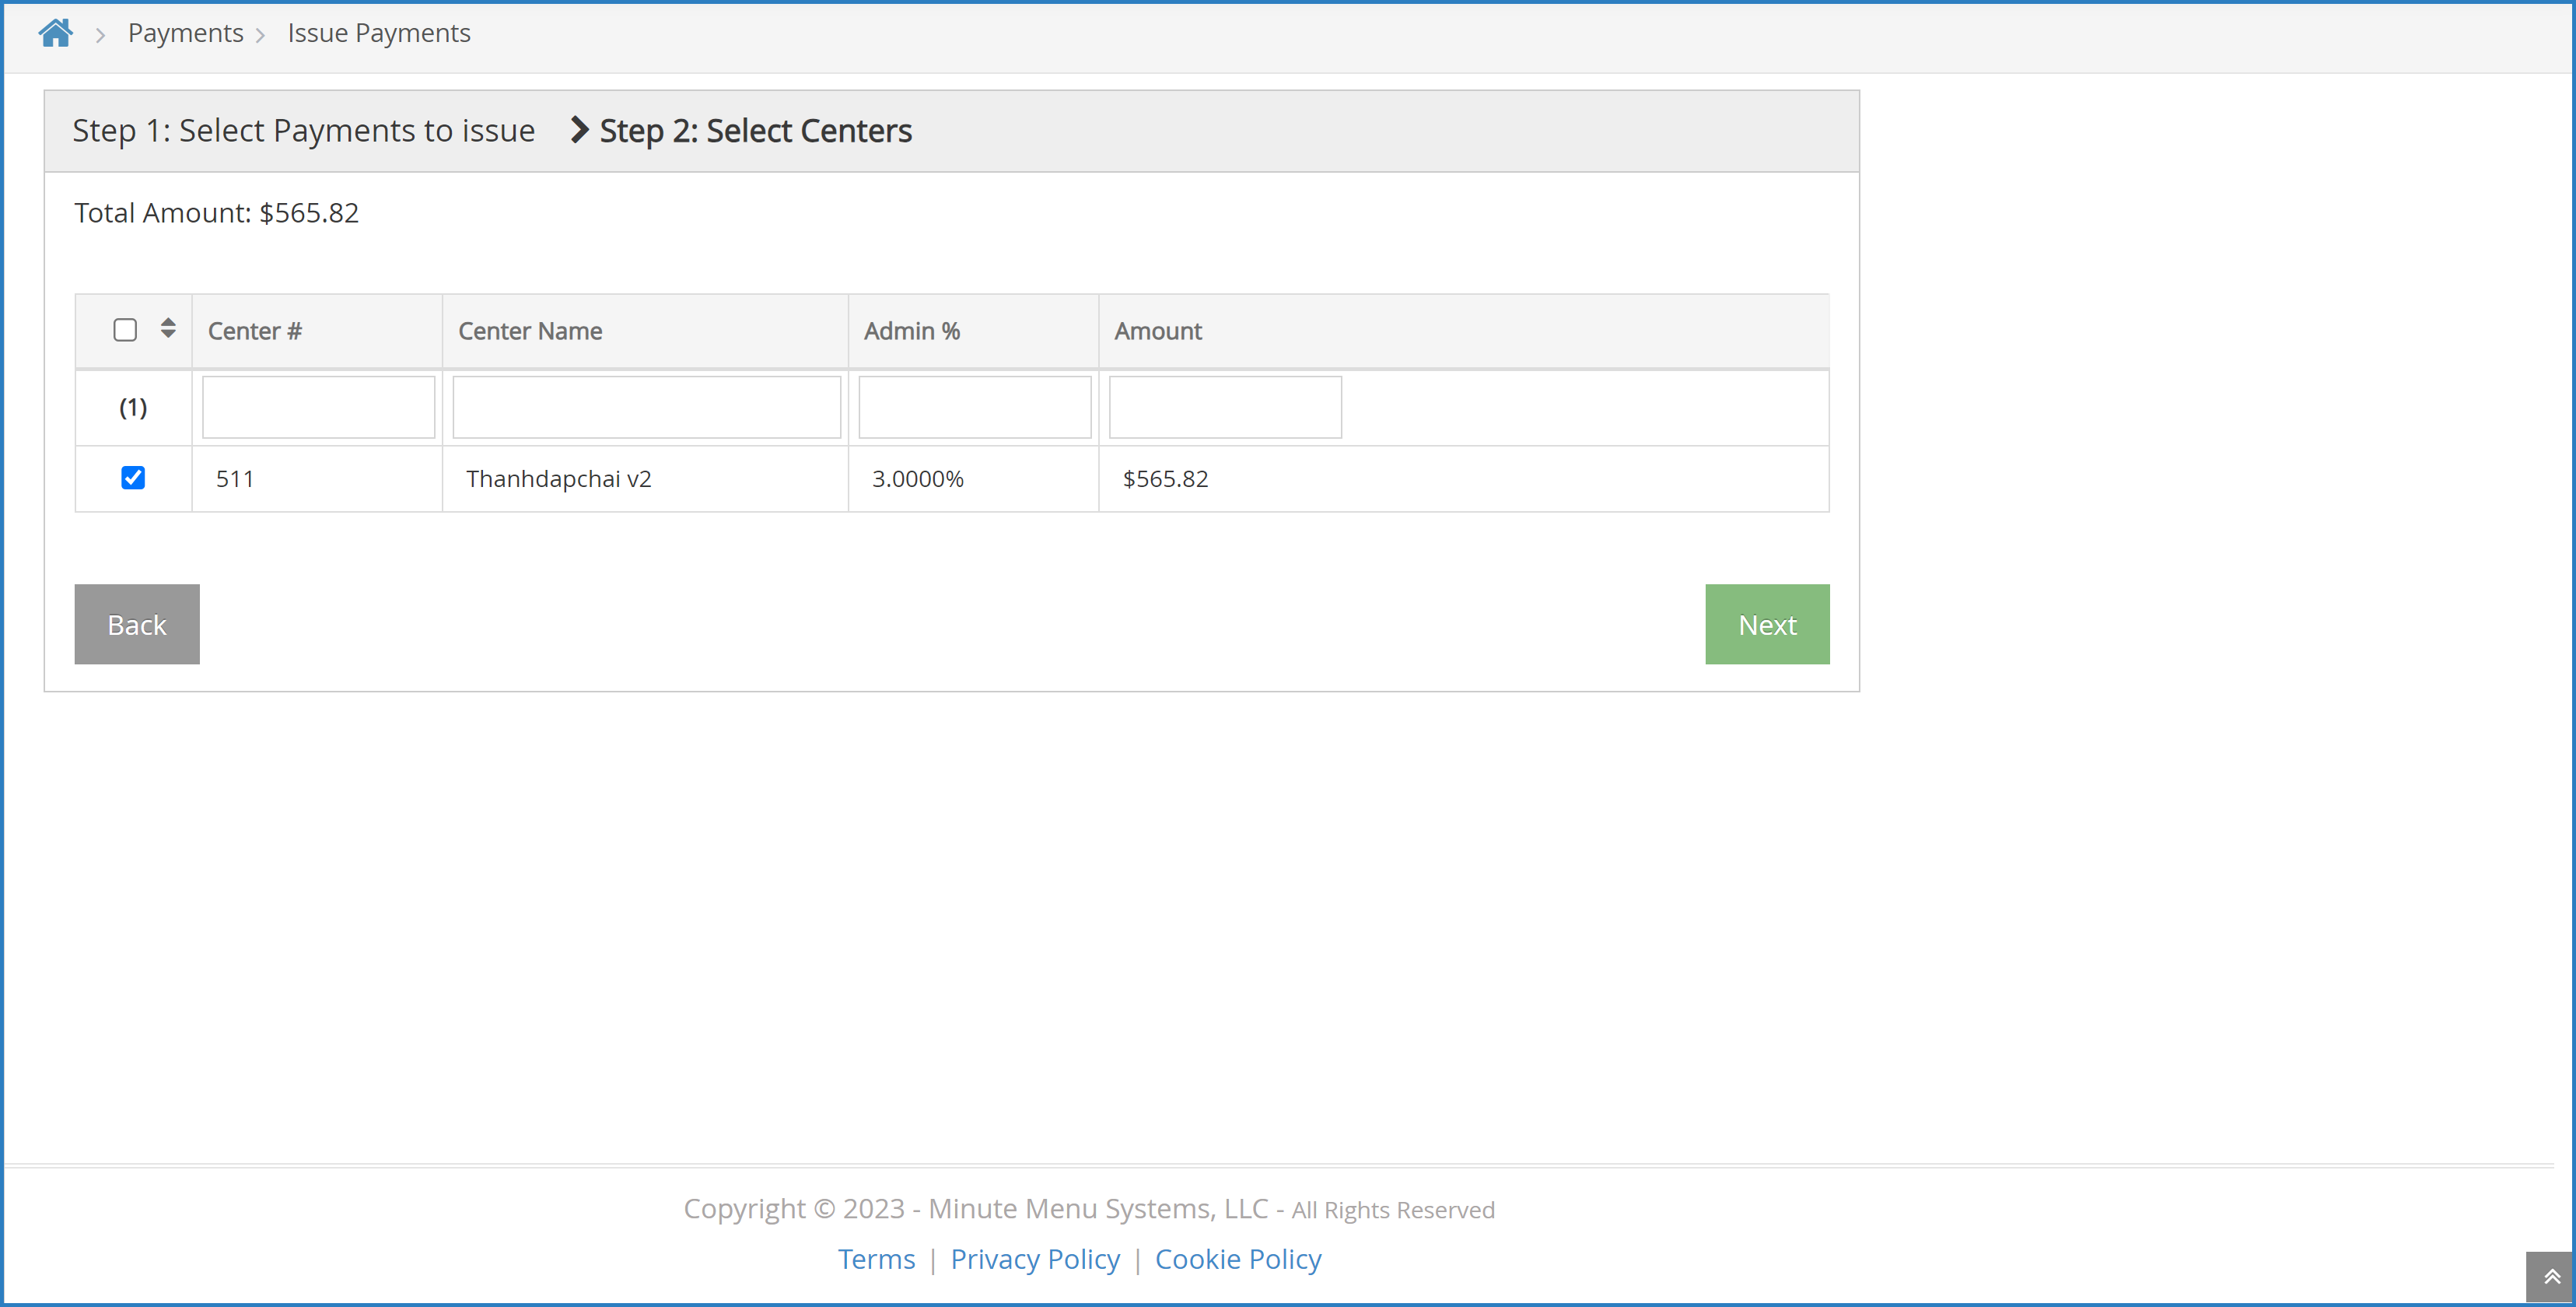
- Click Next.
- In the Step 3: Print & Export section, click the Starting DD Number box and enter the starting direct deposit number.
- Click the ACH drop-down menu and select Create ACH Prenote File.
- Click Export. The Prenote file downloads.
- Send the Pre-Note file to your bank to test the direct deposit.
- Contact your bank to determine where and how to upload the file to their website.
- If the file is rejected, find out why, fix the error, generate a new file, and try uploading again.
- If the file goes through, and you confirm that there were no issues, the ACH file has been set up successfully, and you can now use KidKare to generate ACH files for direct deposit.

 next to Pay via Direct Deposit.

