
Parachute helps manage and track your all of your different types of expenses. Simply login to Parachute, and enter all expenses as shown below.

View & Search Expenses
- From the menu to the left click Accounting, then click on Expenses.
- The Expenses page opens.
- To search for expenses that have already been entered, use the search bar or filters.
- Search: Start entering in any data found on the invoice(s) you're looking for to automatically filter the search results.
- Filters
- Date or Date Range: When the income was received
- Category: Select the expense category for the expense line item you're looking for. This list will include custom categories that have been added.
- Receipt Total: The amount of the total expense line item.
- Recurring: This will filter based on if the expense is recurring or not.
- Export: Export data to an Excel or CSV File. Only the data currently being populated based on the selected filters and columns will be exported.

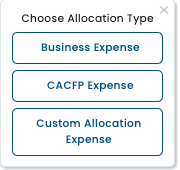
Expense Allocation Types
Within Parachute you are able to categorize your different expense entries by designating Allocation Types. There are 3 kinds of Expense Allocation Types:
- Business Expenses
- This category allows you to record all of your general business expenses (i.e. art supplies, new equipment for your facility, staff costs, etc.).
- CACFP Expenses
- This category is meant to track receipt data from purchases made for the Food Program.
- Custom Expenses
- This category allows you to track expenses and purchases that should be allocated to specific funds or expense types. (i.e. purpose specific grants or dedicated funding). You can create and name multiple Custom Expense Allocation Types.
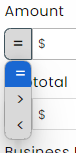
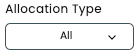
You can view each Allocation Type together in one table, or separately by clicking  on the dropdown.
Add Business Expenses
To add new general business expenses:
- From the menu to the left click Accounting, then Expenses.
- From Expenses tab, click
 in the top right corner and select Business Expense Allocation Type.
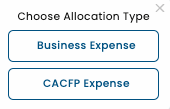
- The Add Business Expense page opens.
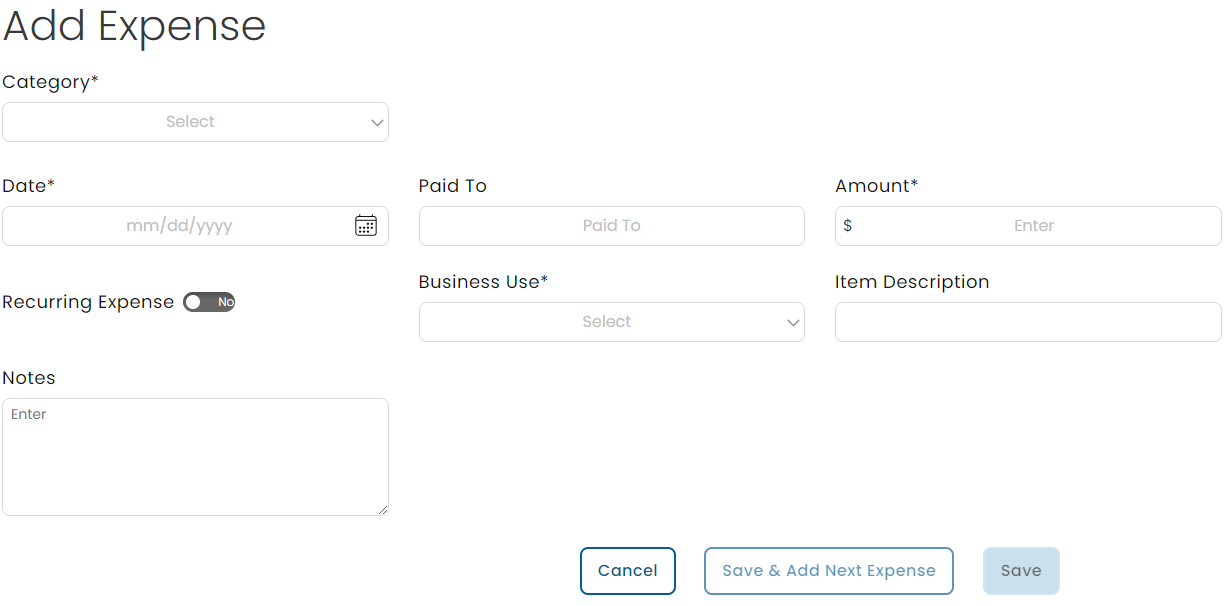
- Fill out the required fields for the expense being entered.
- Category: If one of the standard categories does match your expense you can add a custom category. To do this, scroll to the bottom of the list and click
 . After adding a custom expense type you can click the
  button to edit it or
 to delete it from this list.
Note: If you delete a custom expense type in the Category list it will not delete or make any changes to expenses related to that custom field
- Date: The date the expense was charged
- Paid To: The source of the expense
- Amount: The total amount of the expense
- Business Use:
- 100% Business Use
- Actual Business Use: This allows you to manually enter what % of this expense is for your business
- Time/Space%: This will use your Time/Space calculation to determine how much of this expense should be considered business use
- Vehicle
- Recurring: Select how frequently this Expense should show up as a new line item
- Category: If one of the standard categories does match your expense you can add a custom category. To do this, scroll to the bottom of the list and click
- Once all fields are completely filled out, click
 to return to the Business Expenses page, or click
  to start entering another expense.
 in the top right corner and select Business Expense Allocation Type.

 . After adding a custom expense type you can click the
  button to edit it or
 to delete it from this list.
 to return to the Business Expenses page, or click
  to start entering another expense.
Add CACFP Expenses
Note: Any expenses recorded within the Food Program will automatically populate within Parachute. Additionally, any CACFP expenses recorded within Parachute will populate within the Food Program and all corresponding reports. Expenses can be edited across both domains.
This section works like the Itemized Entry within Food Program. To add new food program related expenses:
- From the menu to the left click Accounting, then Expenses.
- From the Expenses tab, click in the top right corner and select CACFP Expense Allocation Type.
- The Add CACFP Expense page opens.
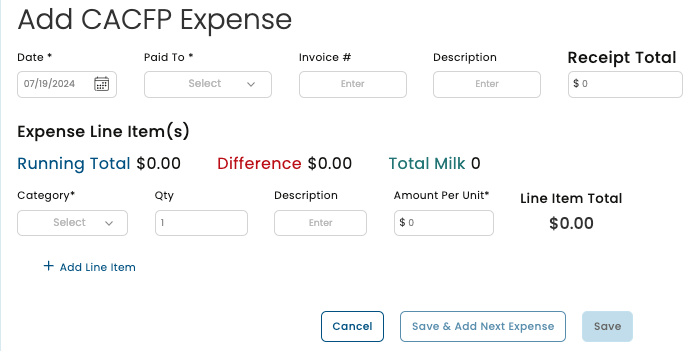
- Fill out the required fields for the expense being entered.
- Date: The date the expense was charged
- Paid To:
- The vendor for this expense
- To add additional vendors click
 . After adding a new vendor you can click the button to edit it orto delete it from this list.
- Invoice #: The number or receipt that you receive for purchase
- Description: Any additional detail you would like to add to this expense
- Receipt Total: The overall total you are claiming on the receipt
- Expense Line Item(s):
- This section allows you to break out the different purchases that make up the Receipt Total. You can see 3 different calculations as you add your different line items:
- Running Total: How much you've entered in individual line items
- Difference: How much you still need to add to match the Receipt Total
- Total Milk: How much milk has been added from this receipt
- Category: Click the drop-down menu and select the expense category. All expense categories except Unapproved count towards reimbursement for the food program.
- Qty: You can enter up to four (4) decimal places. This box defaults to 1.
- If you selected a Milk category, you can use the Gallons Converter.
- Click
 or type the number in the quantity box.
- Click
- If you selected a Milk category, you can use the Gallons Converter.
- Description: Allows you to give more detail on this line item
- Amount Per Unit: How much each unit in this line item cost individually on average
- Line Item Total: The amount of the quantity multiplied by the amount per unit
- This section allows you to break out the different purchases that make up the Receipt Total. You can see 3 different calculations as you add your different line items:
- You may add as many line items as you need to meet the receipt total by clicking
 , or you can remove an added line item by clicking
- Date: The date the expense was charged
- Once all fields are completely filled out, click to return to the CACFP Expenses page, or click to start entering another expense.


 . After adding a new vendor you can click the
  or type the number in the quantity box.
 , or you can remove an added line item by clicking
Add Custom Allocation Type Expenses
Custom Allocation Type Expenses are meant to allow you to allocate purchases and business expenses to specific grants, funding, or Expense Accounts.
From the menu to the left click Accounting, then Expenses.
- From Expenses tab, click
 under the Search box then click
- You can add as many Custom Allocation Types as you need in order to keep track of your seperate expenses
- After adding a custom allocation type you can click the button to edit it orto delete it from this list, as long as it does not already have any expenses allocated
- Next click in the top right corner and select Business Expense Allocation Type.
- The Add Custom Expense page opens.
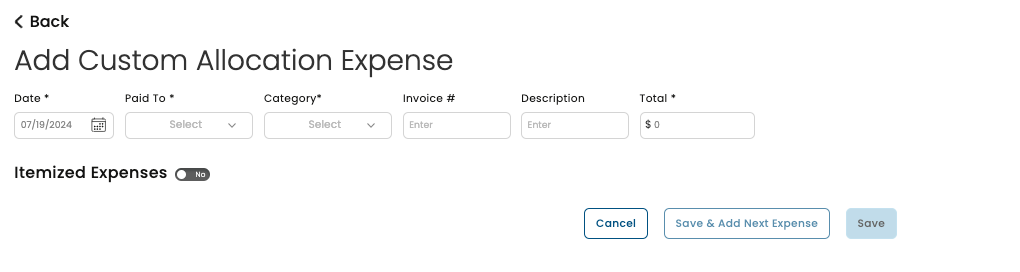
- Fill out the required fields for the expense being entered.
- Date: The date the expense was charged
- Category: If one of the standard categories does match your expense you can add a custom category. To do this, scroll to the bottom of the list and click . After adding a custom expense type you can click the button to edit it orto delete it from this list.
Note: If you delete a custom expense type in the Category list it will not delete or make any changes to expenses related to that custom field
- Paid To:
- The vendor for this expense
- To add additional vendors click . After adding a new vendor you can click the button to edit it orto delete it from this list.
- Invoice #: The number or receipt that you receive for purchase
- Description: Any additional detail you would like to add to this expense
- Total: The overall total you are claiming on the expense
- Itemized Expenses:
- You may add multiple line items by clicking
 which will bring up a new section
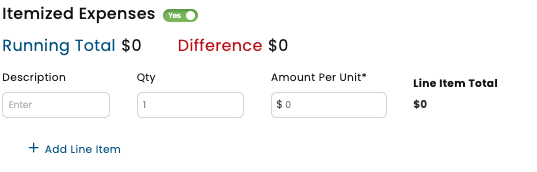
- Description: Allows you to give more detail on this line item
- Qty: How many units are included in this line item
- Amount Per Unit: How much each unit in this line item cost individually on average
- Line Item Total: The amount of the quantity multiplied by the amount per unit
- You may add multiple line items by clicking
- You may add as many line items as you need to meet the receipt total by clicking , or you can remove an added line item by clicking
- Date: The date the expense was charged
- Once all fields are completely filled out, click to return to the Custom Allocation Expenses page, or click to start entering another expense.
 under the Search box then click


 which will bring up a new section
Edit Expenses
To edit an expense that has already been entered:
- From the menu to the left click Accounting, then Expenses.
- From the Expenses tab, click on the expense that needs to be edited from the
 section, or click the dropdown to select the Allocation Type you would like to edit
 - Click on the desired line item
- Make adjustments to fields as needed.
- Click Save.
 section, or click the dropdown to select the Allocation Type you would like to edit