
All Parachute related settings can be found by clicking the Settings on the bottom left of your screen. Parachute gives you several options on customizing how you send out invoices and notifications, as well as manage your display and site settings. You can also sign up for ParaPay, and manage who pays transaction and processing fees.
View & Edit Parachute Settings
- From the menu to the left, click Settings.
- The settings page opens. Click on each tab to review the settings.
- User Settings & Notifications: Here you can update your password, edit display settings, and configure notifications sent both to you and Guardians/Agencies.
- Subscription & ParaPay: Here you can manage your Parachute subscription, sign up to take online payments through ParaPay, and manage who pays transaction fees.
- Provider Details: Here you can enter in information about your site. If you have a Food Program account you should manage this information from the My Site section in the Food Program side.
- Templates: Here you can update your templates for the notifications sent to parents/guardians and agencies.
- Site Management : Here you can update your Default Rates and Hours of Operation, which will be used to help you with different calculations.
- To edit any of the settings, click
 in the top right corner of the screen.
 - Once changes have been made, click SAVE.
 in the top right corner of the screen.
Review Settings & Options
Review this section for a detailed breakdown of each settings tab listed above. Here you will find answers to any questions about fields, what they mean, and what they do.
User Settings & Notifications
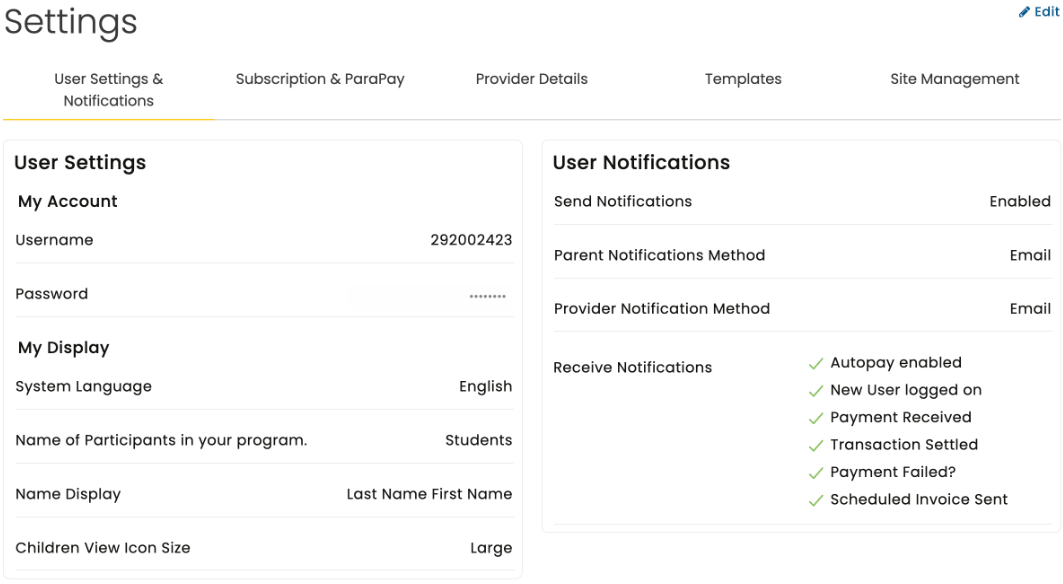
- My Account
- Username: View the username you use to login
- Password: Here you can update your password by clicking Change Password?
- My Display
- System Language: Allows you to select which language to display.
- English (Default)
- Spanish
- Name of Participants in your program: Allows you to select how you refer to participants in your program.
- Kids
- Children (Default)
- Students
- Adults
- Participants
- Clients
- Name Display: Controls the order of how Children and Payer names are displayed.
- Children View Icon Size: Select the size of the icon.
- System Language: Allows you to select which language to display.
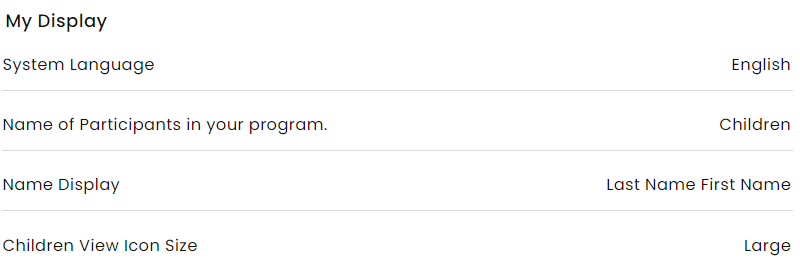
- User Notifications
- Send Notifications
- Enabled: When this is setting is Enabled, new invoices will be sent to all Payers on the invoice. In order to record a payment or issue a refund on the Invoice it must have already been sent to the Payer. Invoices can be saved before they are sent. These invoices can be sent as a later time so that they can be edited.
- Disabled: When this setting is Disabled, invoices will not be sent to Payers. Once created the Invoice will automatically be received by the Payer, meaning that they can be marked paid or refunded manually without needing to be sent first. There is not a way to send an invoice when Send Notifications is set to Disabled.
- Parent Notification Method: Allows you to determine default notification methods for Payers
- Email: Payer email required within Payer Profile
- Text : Your Payer's standard SMS rates apply & Payer mobile phone number required within Payer Profile
- Payers may update their individual notification preferences here. If the necessary data to send your selected default notification method is not available for a Payer a notification will be sent using the available method automatically.
- Provider Notification Method: Allows you to determine how you would like to receive notifications
- Text: Standard SMS rates apply
- Receive Notifications: Determine which notifications you would like to receive.
- Autopay Enabled: Will inform you when one of your Payers has enabled Autopay
- New User Logged In: One of your Payers has logged into the Parent Portal for the first time
- Payment Received: A Payer has sent a payment via ParaPay
- Transaction Settled: Your ParaPay payment has settled, funds are on the way to your bank account!
- Payment Failed: A Payer has attempted to make a payment, but it failed
- Scheduled Invoice Sent: The Invoice you scheduled has successfully been sent
- Send Notifications


Subscription & ParaPay
Here you can manage your Parachute subscription, sign up to take online payments through ParaPay, and manage who pays transaction fees.
- Subscription Management
- Subscription Type: Allows you to see what Parachute Subscription plan you are on
- Next Bill Date: The Date you should expect to be charged to renew your Parachute Subscription
- Payment Method: Payment method you should expect to be charged when your subscription is renewed
- Manage Subscription: Click this to either cancel your Parachute subscription or update the payment method you would like charged when your subscription is renewed.
- To Updateyour Payment Method:
- Click Update Payment Method.
- Enter in new Payment Method information.
- Click Update Card.
- To Cancelyour Parachute Subscription:
- Click Cancel Subscription.
- A pop-up appears. Select Yes, Cancel to confirm that you are cancelling your subscription.
- Once canceled you will see the date your subscription will expire and have the option to resubscribe.
- To Updateyour Payment Method:
Note: If you cancel your Subscription before it is set to expire you will still have access to Parachute until the expiration date. After that date passes will loose access and you must resubscribe to gain access to any data entered into Parachute.
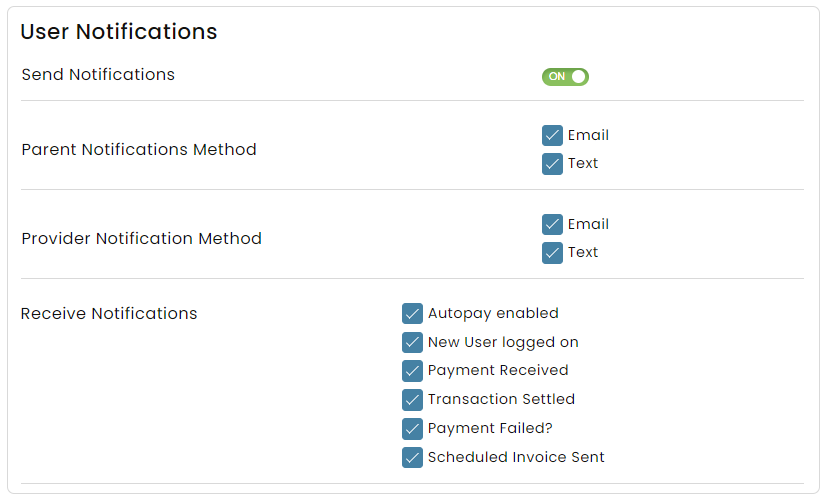
- ParaPay
- Signing up for ParaPay allows you to take payments from Guardians and Agencies directly through Parachute. In order to begin processing you must go through the onboarding verification flow with our secure Payments Processor, Stripe.
- To begin the verification process:
- From the Subscriptions & ParaPay tab, click Begin Onboarding Verification.
- Enter in business information so that you can begin processing payments
- ParaPay Enabled
- On: After signing up for ParaPay all active Payers with Payer Permissions can pay for invoices online
- Off: This disables Parents and Guardians from being able to pay invoices online using ParaPay
- User Initiated Payments
- On: This allows Guardians and Agencies to create Payments without receiving an invoice first
- Off: Disables the ability for Guardians and Agencies to send a payment without first receiving an Invoice from you
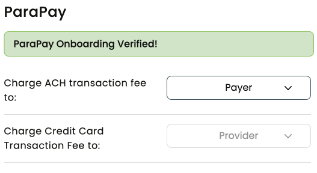
- Charge ACH fee to
- Payer: Payer is automatically charged $1 when paying invoices with ACH
- Provider: You are automatically charged $1 when the Payer pays an invoice with ACH
- Charge Credit Card Transaction Fee to:
- Payer: Payer is automatically charged processing fees when paying invoices with credit, debit or prepaid cards
- Provider: You are automatically charged processing fees when the payer pays an invoice with a credit, debit or prepaid card.
- ParaPay Enabled
- Once you complete the verification steps Payers can begin paying invoices online immediately. Your first disbursement may be delayed by a few business days until your account has been approved. Add as much information as you can at onboarding to expedite the account approval process. Learn more about ParaPay here.
- From the Subscriptions & ParaPay tab, click Begin Onboarding Verification.
- To begin the verification process:
- Signing up for ParaPay allows you to take payments from Guardians and Agencies directly through Parachute. In order to begin processing you must go through the onboarding verification flow with our secure Payments Processor, Stripe.


Provider Details
Here you can enter in information about your site. If you have a Food Program account you should manage this information from the My Site section on the Food Program side.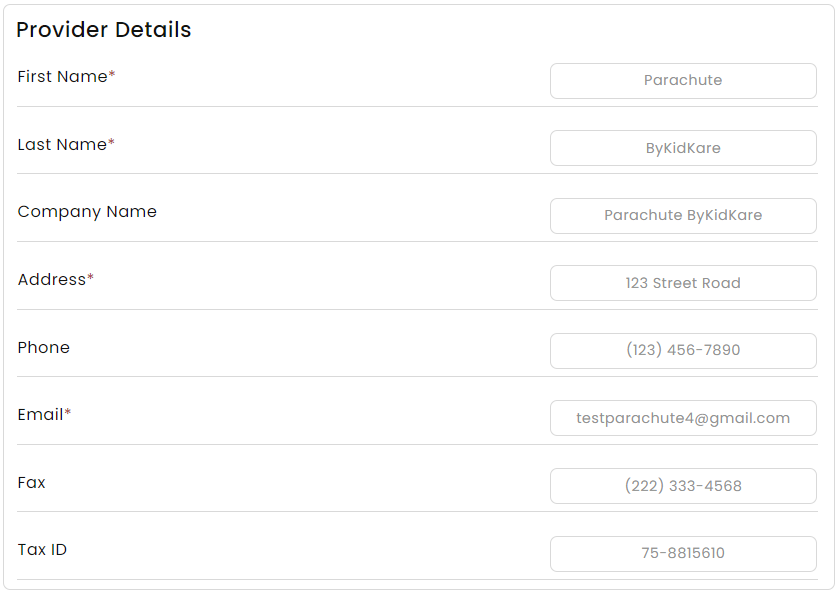
- Site Name: Name of your Site. This is the name that will show up on Guardian and Agency notifications and invoices
- Company Name: The name of your company, if different from the site name
- Name: Your first and last name
- Address: The physical address of your site
- Phone: This is the number that text notifications will be sent to, if set as your desired notification type
- Email: This is the email address we will use to alert you to upcoming events regarding your subscription and where all Parachute notifications will be sent, if set as your desired notification type
- Fax: Your fax number
- Tax ID: The tax number you use to file your taxes at the end of the year. This will be used for Parent Reporting purposes
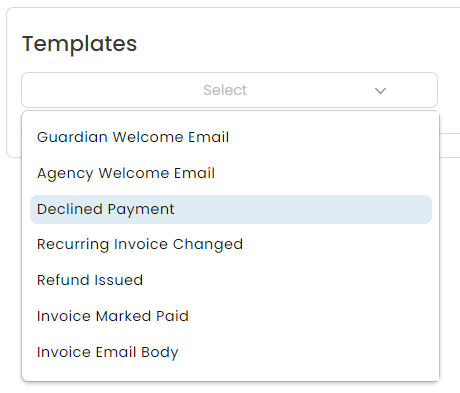
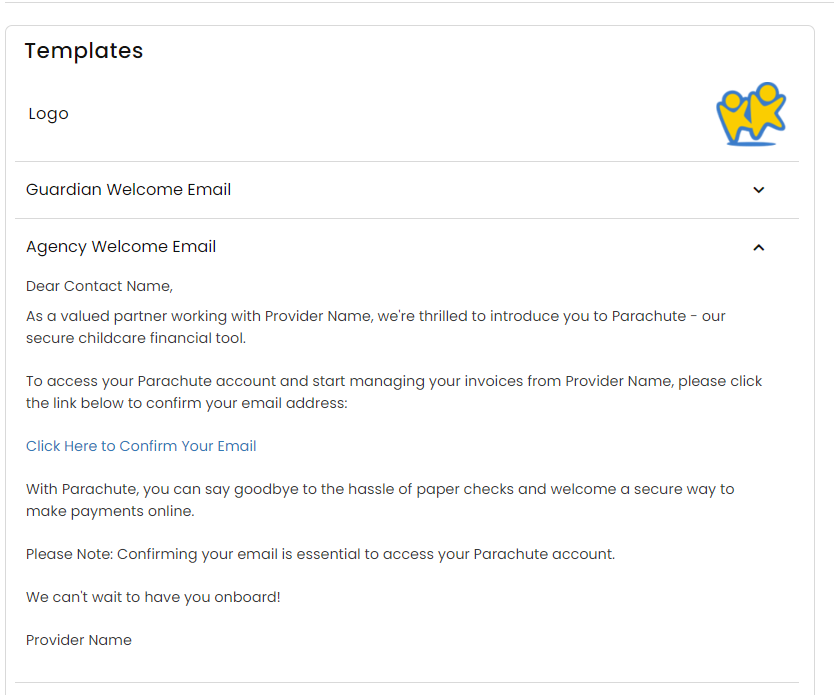
Templates
Here you can update your templates for the notifications sent to parents/guardians and agencies.
- To edit your Templates:
- Click on the Templates tab in your Settings.
- Click the
 button in the top right corner of the screen.
 - Select the template you want to edit in the drop down.
- Update which ever text, tags or attachments you would like to customize
- Without removing any of the blue bubble links, you can edit the text or add attachments as desired.
- Once edits are complete, click SAVE.
- Choose another template to edit.
- Once all edits are complete, scroll to the top of the page and click SAVE.
- To review the emails edits, click on the down arrow next to each template for a preview.
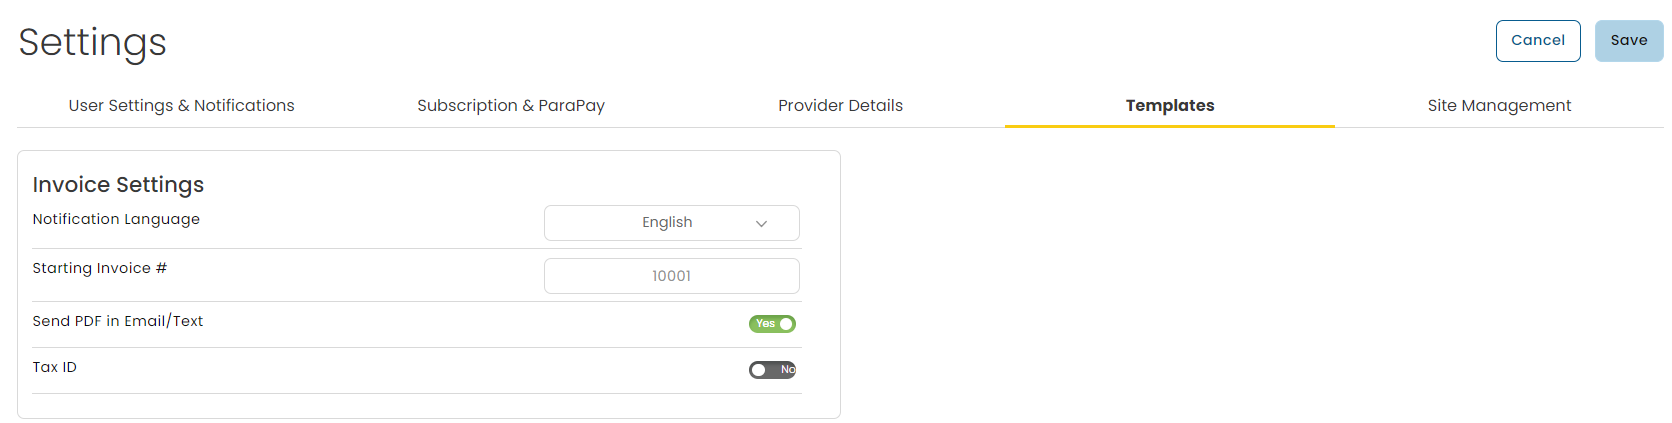
- Invoice Settings
- Notification Language: Select which language you would like the notification to be sent in
- Starting Invoice #: Enter in what you want your starting invoice number to be, if you do not enter in a number it will be auto generated
- Send PDF in Email/Text: If Yes is selected then a PDF of the Invoice will be included as an attachment in the notification sent to the Payer
- Logo: Click the Camera icon to upload your logo, which will appear in Invoices and at the bottom of email notifications
 button in the top right corner of the screen.


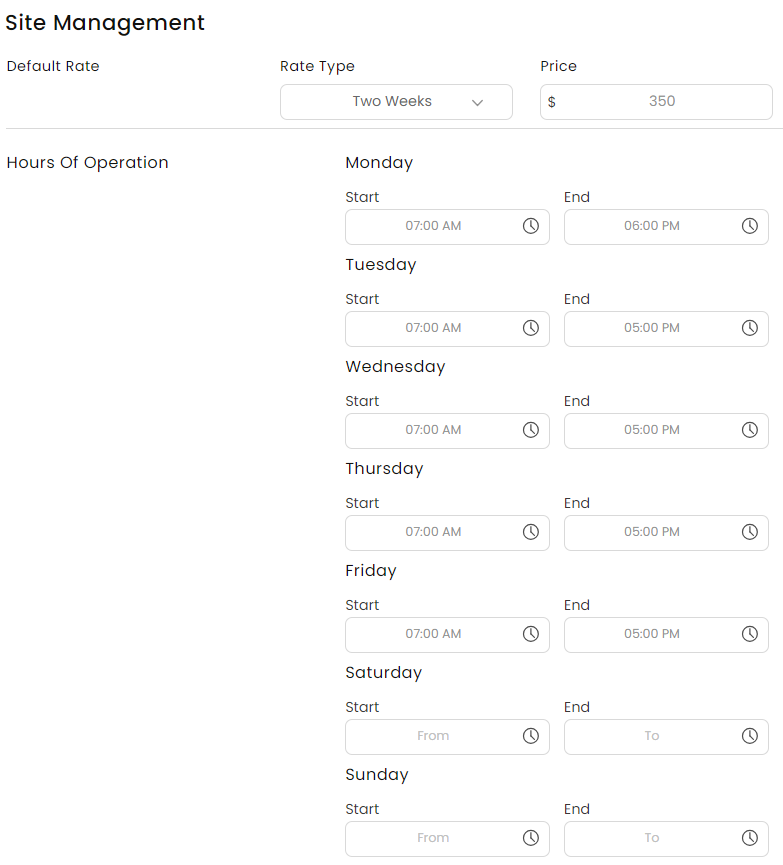
Site Management
Here you can update your Default Rates and Hours of Operation, which will be used to help you with different calculations.
- Default Rate: Use this to help you calculate Invoice fees
- Rate Type Options: Hour, Half-day, Day, Week, Two Weeks, Month, Year
- Price: The dollar ($) amount you charge per unit selected above
- Hours of Operation: Allows you to enter the standard hours your site is open to participants. This is used to help calculate your Time/Space calculation. Select your standard hours for each day of the week

3. Accounting Setting: Select Yes if you use KidKare Food Program and would like your CACFP reimbursements to be entered as income automatically.
