
You, the sponsor, and centers can both enroll children. Centers can also import children from another program, such as Procare. When centers enroll children, those children are automatically set to Pending, you must review and activate these children. For more information, see Activate Children.
IMPORTANT! Check with your center to see if they have Procare before you enroll children. Do not enroll children if your center is planning to import from Procare, as this can result in duplicate records.
Instructions below walk through enrolling new participants from the sponsor level. To see how to enroll new participants from the center level, see Add Participants Manually for center users.
- From the menu to the left, click Children.
- Select Enroll Child.
- Click the Select Center drop-down menu at the top of the window and select the center for which to enroll children. The Enroll Child page opens. The page is broken into three (3) steps with separate sections, as shown in the image below.
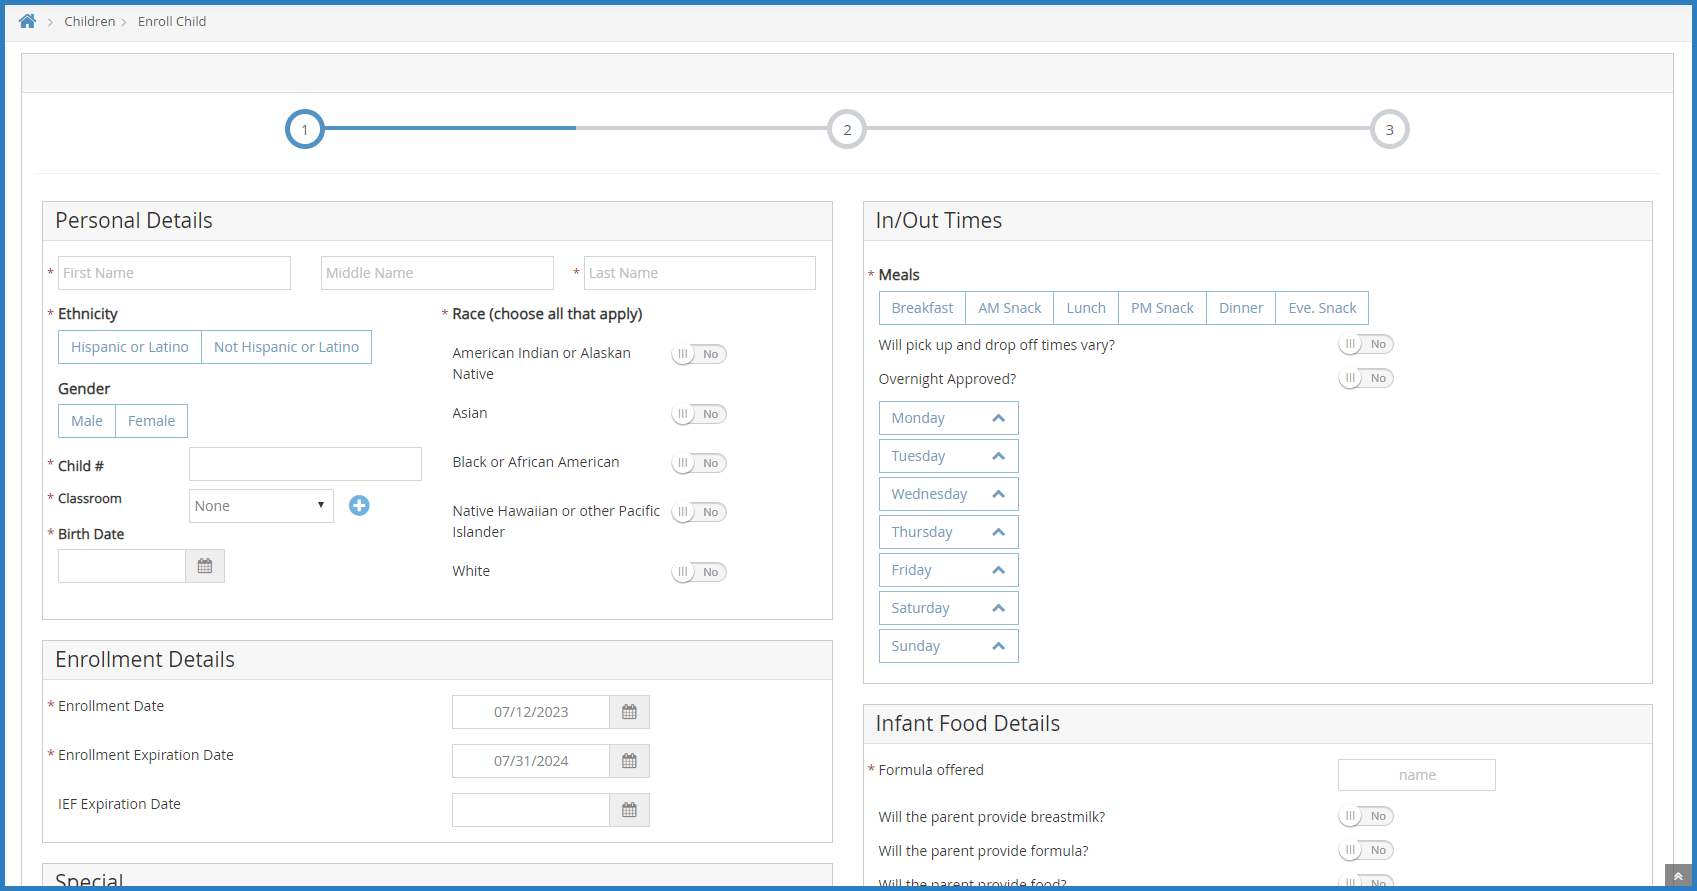
- In the Personal Details section:
- Click the First Name, Middle Name (optional), and Last Name boxes and enter the child's full name.
- In the Ethnicity section, check the Hispanic/Latino box or the Not Hispanic box.
- In the Race section, click
 next to each option that applies.
 - Click the Child # box and enter a child number, or accept the system-generated number. You can enter up to four characters in this box.
- Click the Classroom drop-down menu and select the classroom to which to assign this child. You can also enter a new classroom name.
- Click the Birth Date box and select the child's date of birth. Their age displays to the right of this box automatically.
- In the In/Out Times section:
- Select the Meals for which this child participates.
- Click
 next to Will pick up and drop off times vary? to indicate that pick up and drop-off times may vary from what is entered here.
 - Click next to Overnight Approved? if this child is approved to remain in care overnight.
- Select each day the child will be in care and enter their in and out times in the corresponding box that display.
- In the Enrollment Details section, select the child's Enrollment Date, Enrollment Expiration Date, and IEF Expiration Date. The Enrollment Date box defaults to today's date.
- If this is an infant, complete the Infant Food Details section. If this is not an infant, continue to Step 8.
- Click the Formula Offered box and enter the formula offered to this child.
- Click next to each of the options below that apply:
- Will the parent provide breastmilk?
- Will the parent provide formula?
- Will the parent provide food?
- Click
 next to Infant Form of File to indicate you have an infant form on-file for this child. This option may not be required in all states. Contact your State Agency for guidance.
- Next, complete Special and Diet Information sections, as needed. Click
 next to each option in these sections that apply to the child you are enrolling. You can also add a Diet Expiration Date and Notes to the child's Diet Information.
 - In the Doctor Information, enter the child's primary care physician's name and phone number, if needed.
- If this is a school age child, complete the School Details section. If this is not a school age child, go to Step 11.
- Click the School Name drop-down menu and select the school this child attends.
- Click the School District drop-down menu and select the child's school district.
- Click the School # box and enter the school's identifying number.
- Click the Type/Level box and select the child's school level. You can also select No School or School Age.
- In the Pay Details section:
- Click the Pay Source drop-down menu and select Paid by County/State, Paid by Parent, or No Pay.
- Click the Start and End Date boxes to set dates for this payment method.
- Click the Additional Notes box and enter any additional notes about the pay details for this child.
- Click Next. The Primary Guardian form displays.

- Add a primary guardian.
- Click Existing to select an existing parent/guardian. Then, select the contact.
- Click New to add a new parent/guardian and enter their information.
- Click Next. The final enrollment page opens. If any siblings are found (children with the same parent), they display in the Siblings and Children (Same Parent) section.

- In the Reimbursement/Child Details section:
- Select the child's reimbursement level: Free, Reduced, or Paid.
- Click the FRP Eligibility Basis drop-down menu and select the basis for the child's reimbursement level.
- Add a Title XX/XIX Expiration Date and Qualifying Program #, if needed.
- Click the Sponsor Notes box and add any additional notes about the child's reimbursement details.
- In the Additional Details section, click next to each option that applies.
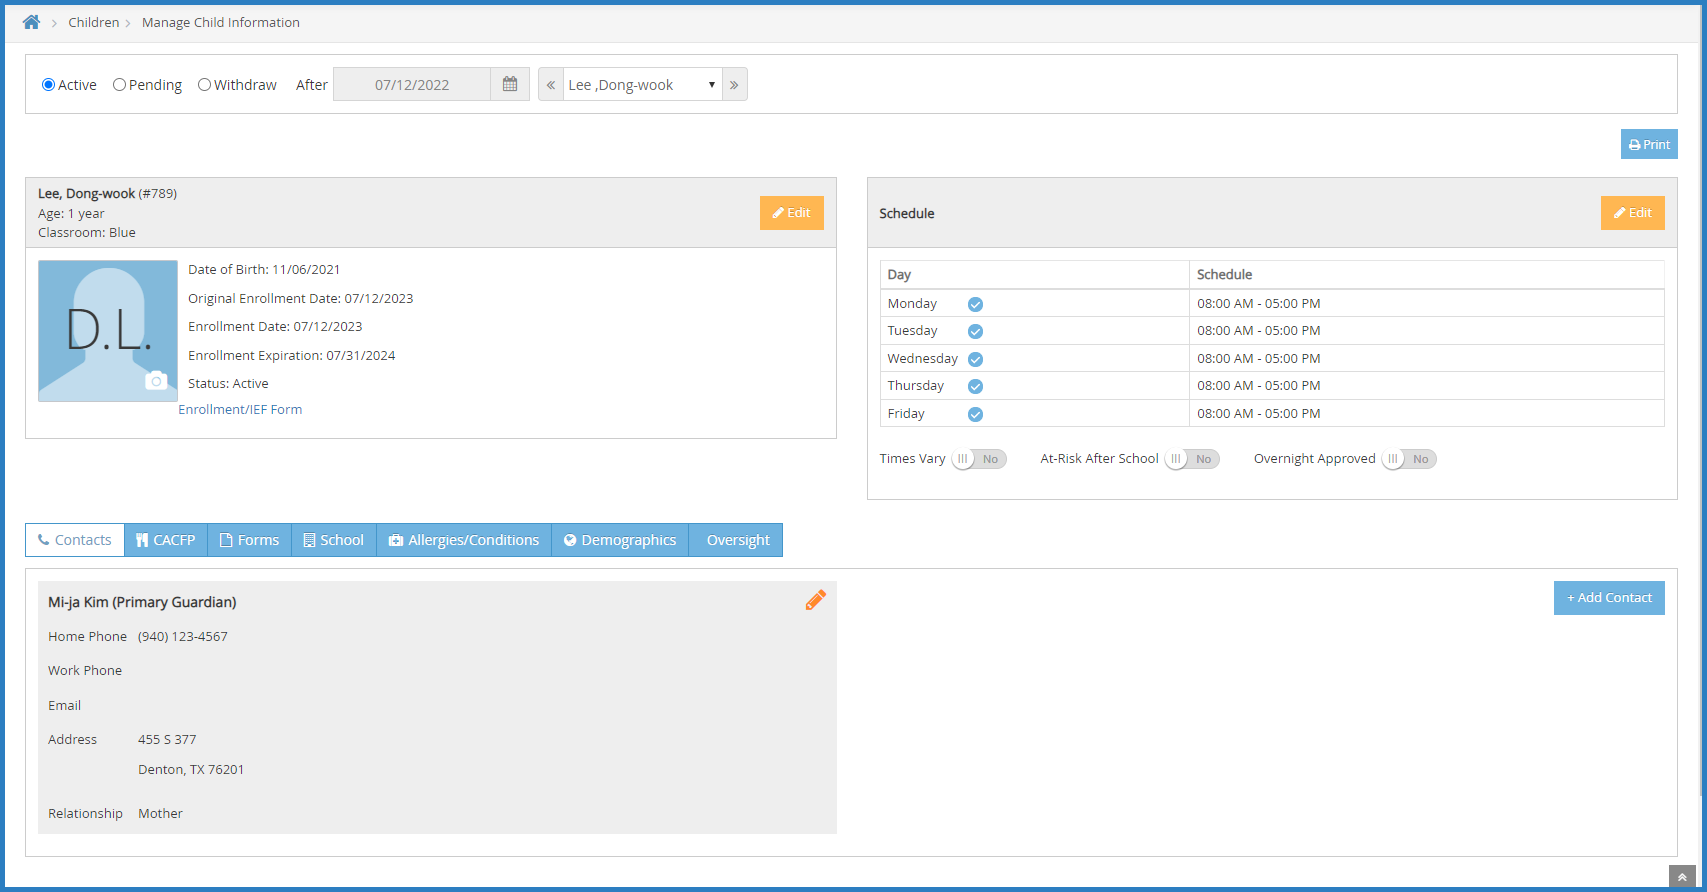
- When finished, click Enroll Child. The Manage Child Information window opens and displays the information you completed. Children you enroll as a sponsor are automatically set to Active status. You can update the child's status as needed in this window.

 next to each option that applies.
 next to Will pick up and drop off times vary? to indicate that pick up and drop-off times may vary from what is entered here.
 next to Infant Form of File to indicate you have an infant form on-file for this child. This option may not be required in all states. Contact your State Agency for guidance.
 next to each option in these sections that apply to the child you are enrolling. You can also add a Diet Expiration Date and Notes to the child's Diet Information.

