Record your menus on the Enter Meal page. Infant and non-infant meals are recorded separately to allow you to meet meal pattern requirements for each. If you or your sponsor have created pre-planned menus, you can select a menu instead of entering the components individually.
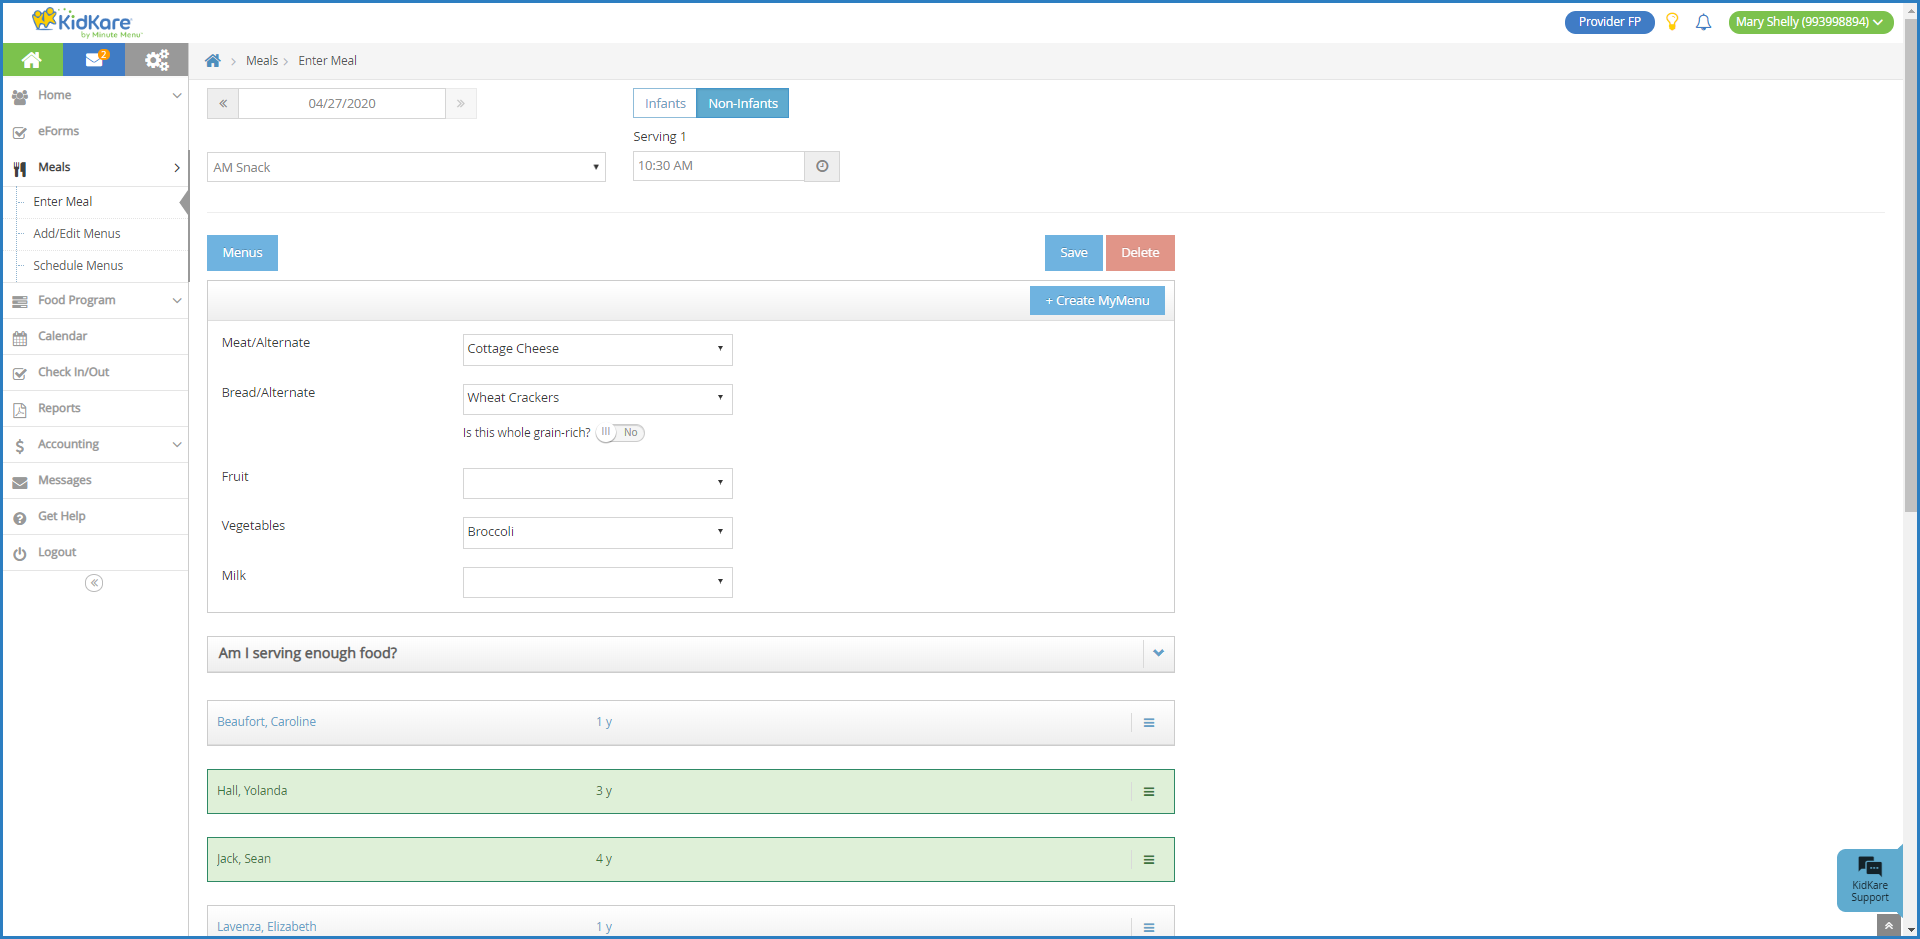
Record Menus for Non-Infants
- From the menu to the left, click Meals.
- Click Enter Meal. The Enter Meal page opens.
- Select Non-Infants.
- Ensure the correct date is selected at the top of the page.
- Click the Select a Meal drop-down menu and select the meal you are recording (Breakfast, AM Snack, Lunch, PM Snack, Dinner, or Eve. Snack).
- Click the Serving 1 box and enter the meal time, if needed. You can also click
 and use the arrows to adjust the time. Your food program sponsor may specify this time. If that is the case, you cannot make changes to this box.
 - Click each meal component drop-down menu and select the food items served at this meal. You can start typing a food name to filter to a specific food.
- For the Bread/Alternate component, click
 next to Is This Whole Grain-Rich to mark the bread/alternate as whole grain rich. The CACFP meal pattern requires that you serve at least one whole grain rich food each day.
Note: Your food program sponsor may also have created foods and already marked them as whole grain-rich. When you select such foods, the whole grain-rich slider is automatically set to Yes.
next to Is This Whole Grain-Rich to mark the bread/alternate as whole grain rich. The CACFP meal pattern requires that you serve at least one whole grain rich food each day.
Note: Your food program sponsor may also have created foods and already marked them as whole grain-rich. When you select such foods, the whole grain-rich slider is automatically set to Yes. - Click each participant name to mark them as present for the meal. If you provide two servings of a meal, click the participant's name again to mark them present at both servings. Both 1 and 2 should be highlighted. You can also click the number to indicate the serving at which the participant was present.
- Click
 to the right of a participant's name to indicate that a school-aged participant was present when they should have been in school. Then, choose from the following (you can select multiple items, if needed):
- Sick
- No School
- Present on Holiday
- If the participant you mark in attendance is 18 years of age or older, the Adult Meal Pattern Substitutions section displays for that participant.
- Click
 next to Was yogurt substituted for milk? if you substituted yogurt for milk at this meal.
 - Click
 next to Was milk served to adults? if milk was served to adults at this meal.
Notes: You can only select one option. When you select an option, the other is immediately set to No. Milk and yogurt substitutions are reflected on the Menu Production Record and on the Food Served report.
next to Was milk served to adults? if milk was served to adults at this meal.
Notes: You can only select one option. When you select an option, the other is immediately set to No. Milk and yogurt substitutions are reflected on the Menu Production Record and on the Food Served report.
- Click
- Click
 in the Am I Serving Enough Food section to view useful tables for the meal. These tables list food components and serving sizes by age group.
 - Click Create My Menu to save this menu for future use. Then, enter a name for the menu in the What is the Name of This Menu box.
- Click the Comments box and enter any comments about this meal. You can enter up to 500 characters in this box. Note that your sponsor must enable this feature for you.
- When finished, click Save.
 next to Is This Whole Grain-Rich to mark the bread/alternate as whole grain rich. The CACFP meal pattern requires that you serve at least one whole grain rich food each day.
 to the right of a participant's name to indicate that a school-aged participant was present when they should have been in school. Then, choose from the following (you can select multiple items, if needed):
 next to Was yogurt substituted for milk? if you substituted yogurt for milk at this meal.
 next to Was milk served to adults? if milk was served to adults at this meal.

Note: Remember that you must have participants checked in before you can record meals. To do so from this page, click a participant's name and then click Check IN. Depending on your sponsor's settings, you may be required to provide an In time for participant checked in on this page.
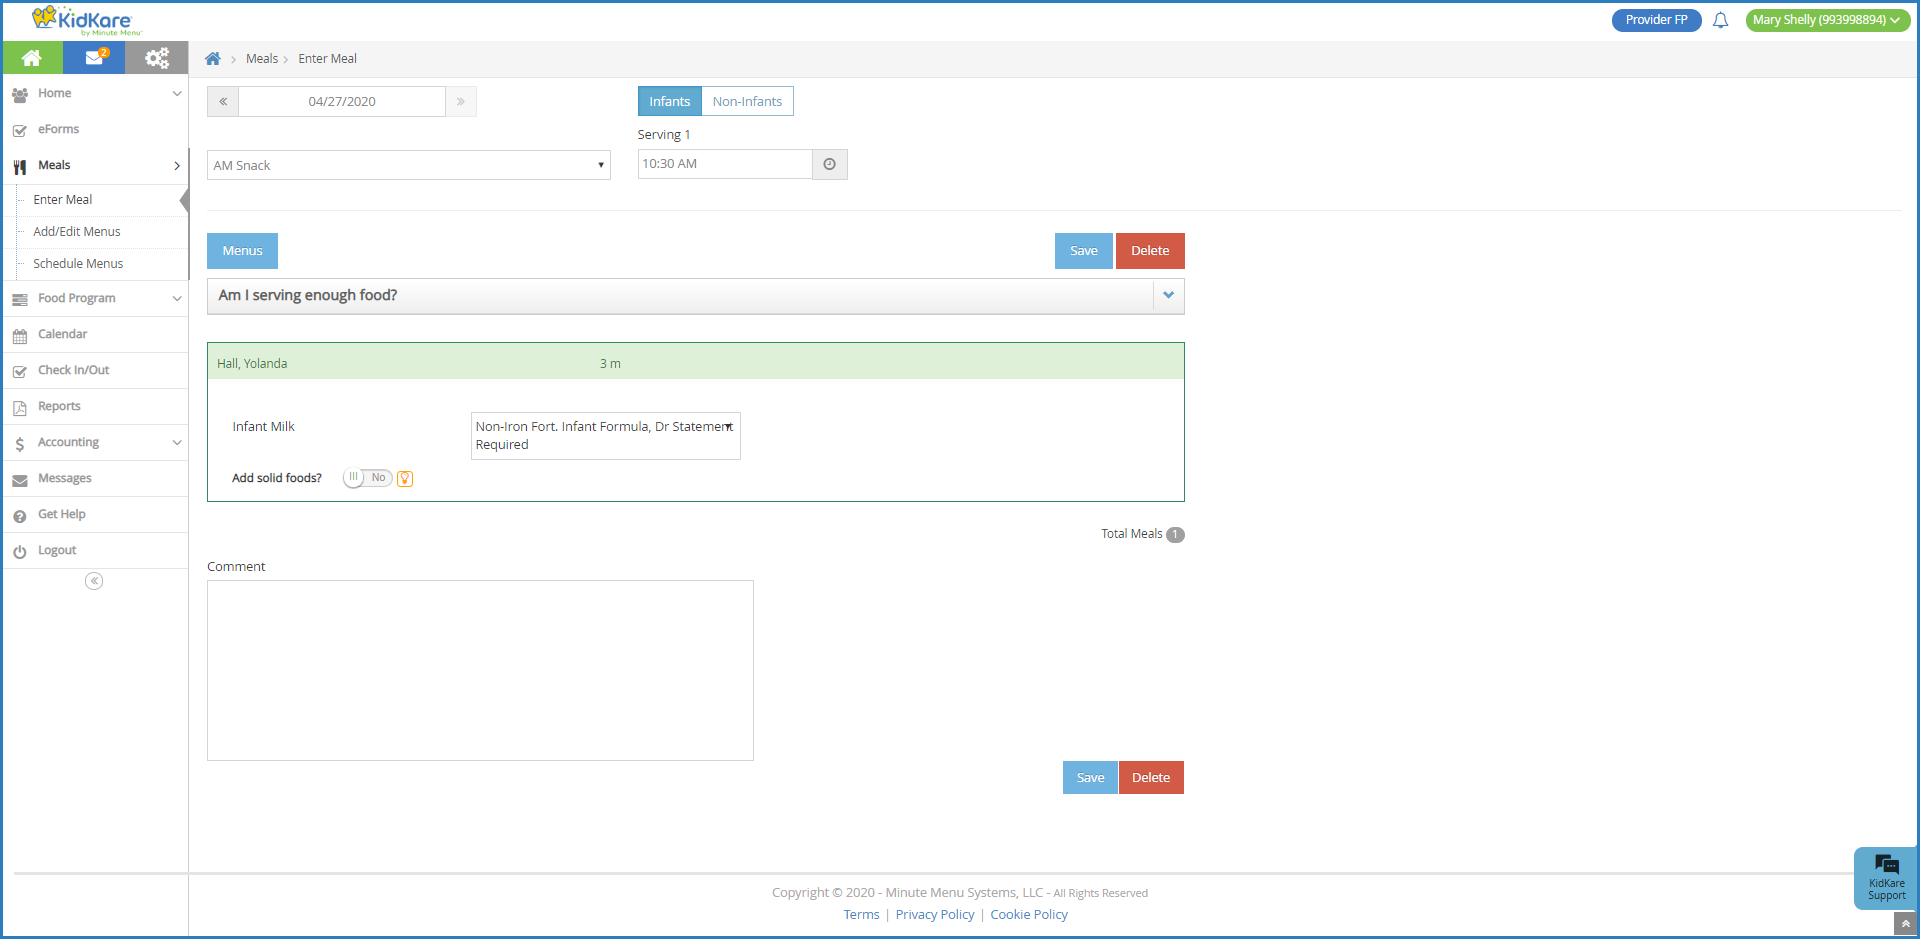
Record Menus for Infants
- From the menu to the left, click Meals.
- Click Enter Meal. The Enter Meal page opens.
- Select Infants.
- Ensure the correct date is selected at the top of the page.
- Click the Select a Meal drop-down menu and select the meal you are recording (Breakfast, AM Snack, Lunch, PM Snack, Dinner, or Eve. Snack).
- Click the Serving 1 box and enter the meal time, if needed. You can also click and use the arrows to adjust the time. Your food program sponsor may specify this time. If that is the case, you cannot make changes to this box.
- Select the infant for whom to record a meal.
- If the infant is ready for solid foods, click
 next to Add Solid Foods. When you set this option to Yes and record foods, the infant is marked as developmentally ready as of the current date. This date is written to the child's record. The Add Solid Foods option is automatically set to Yes when you record meals for this infant in the future.
 - Click each meal component drop-down menu and select the food items served at this meal. You can start typing a food name to filter to a specific food.
- Click in the Am I Serving Enough Food section to view useful tables for the meal. These tables list food components and serving sizes by age group.
- Click the Comments box and enter any comments about this meal. You can enter up to 500 characters in this box. Note that your sponsor must enable this feature for you.
- Click Save.
 next to Add Solid Foods. When you set this option to Yes and record foods, the infant is marked as developmentally ready as of the current date. This date is written to the child's record. The Add Solid Foods option is automatically set to Yes when you record meals for this infant in the future.
Select a Pre-Planned Menu
- From the menu to the left, click Meals.
- Click Enter Meal.
- Select Infants or Non-Infants.
- Ensure the correct date is selected at the top of the page.
- Click the Select a Meal drop-down menu and select the meal you are recording (Breakfast, AM Snack, Lunch, PM Snack, Dinner, or Eve. Snack).
- Click Menus. A pop-up opens and displays your pre-planned menus.
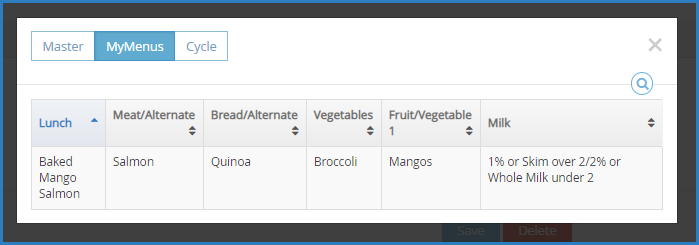 Note: You can click Master to view master menus your sponsor provides in addition to the menus listed on the MyMenus tab.
 - To locate the menu to select:
- Click the column headers to sort meal components in ascending or descending order.
- Click
 to search for a particular menu.
- Click the menu to select it. The pop-up closes and the menu is added to the Enter Meal page.
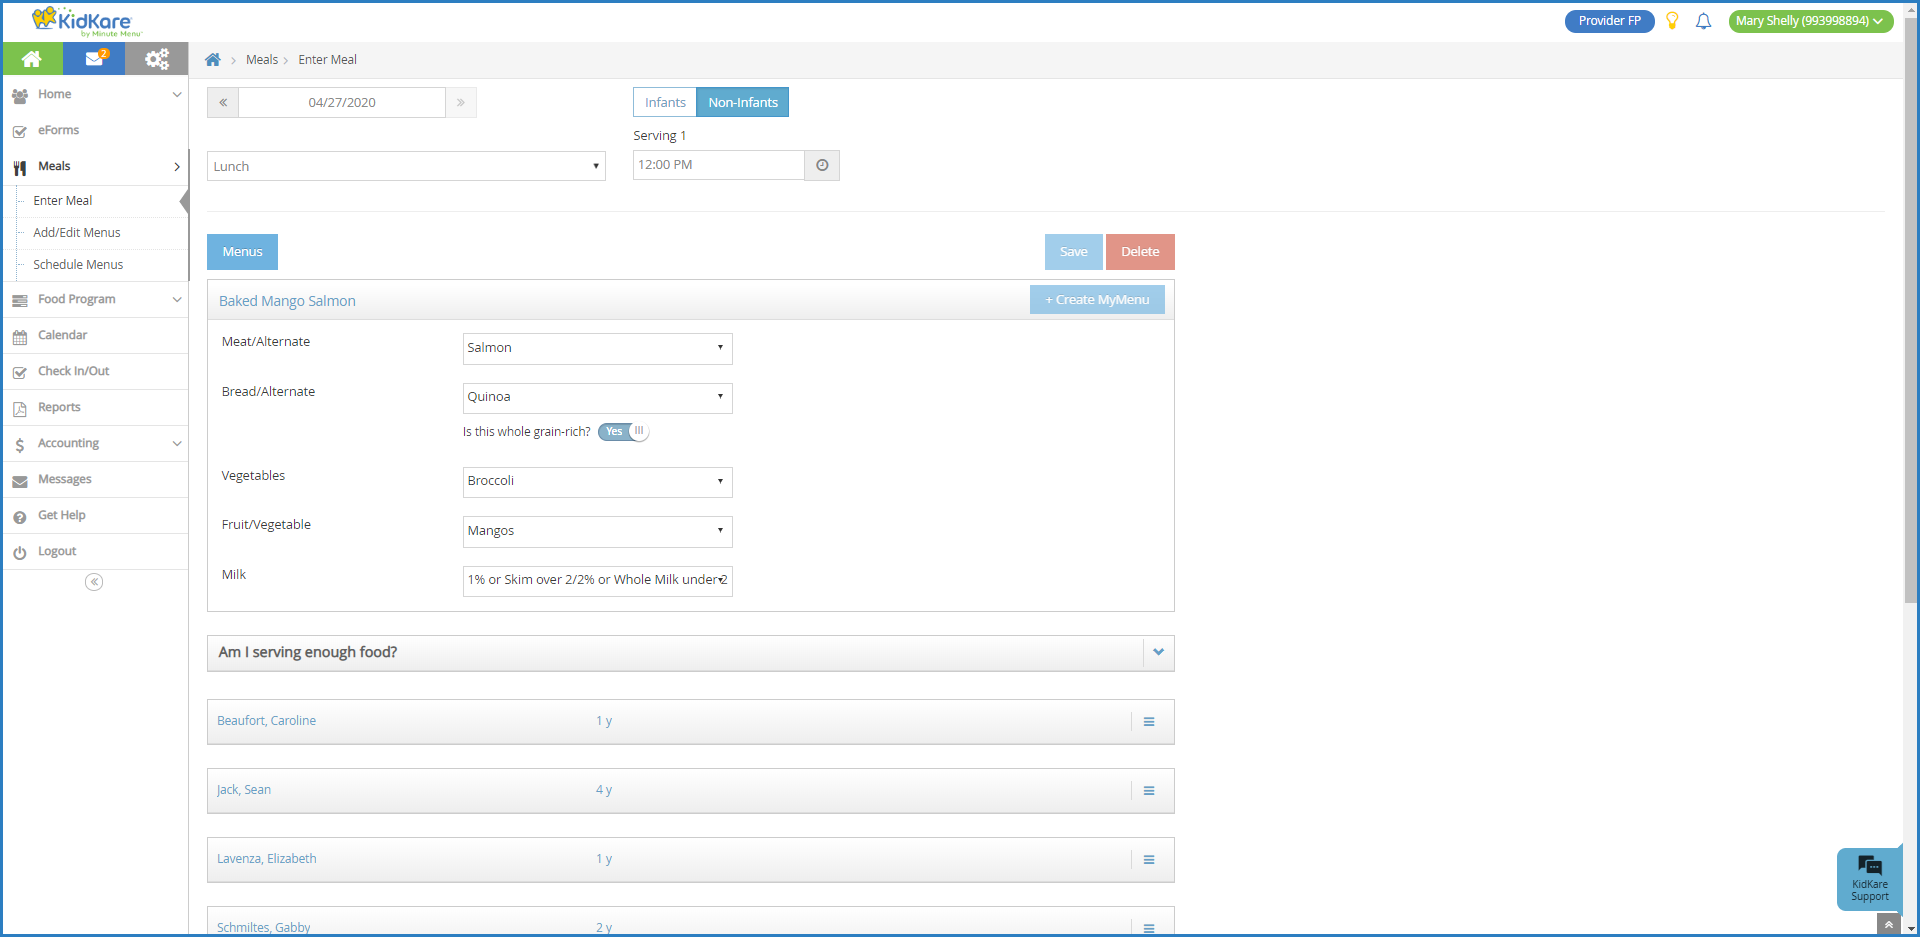
- Click Save.

 to search for a particular menu.
Note: Remember that you must have participants checked in before you can record meals. To do so from this page, click a participant's name and then click Check IN.